70.Okayama Castle Part2

Let me first introduce you two courses going towards the current Okayama Castle. The first one is the course going to the front side of the castle from Okayama Station. The second one is that going to the back side along the riverside of Asahigawa. After reaching the castle, let us enter the restored main tower of the castle. By going to The Okayama Korakuen Garden, you will feel like the lord of the castle.

Features

Let me first introduce you two courses going towards the current Okayama Castle. The first one is the course going to the front side of the castle from Okayama Station. The second one is that going to the back side along the riverside of Asahigawa. After reaching the castle, let us enter the restored main tower of the castle. By going to The Okayama Korakuen Garden, you will feel like the lord of the castle.

The statue of Momotaro in front of Okayama Station, Momotoro “Peach Boy” is a mythological folklore

The Course to the Front side from Okayama Station

It takes about 2km from Okayama Station to the castle. Therefore, it may be a good idea for you to use the city tram or a rental bicycle.

The city tram
The bicycles of Momochari rental system

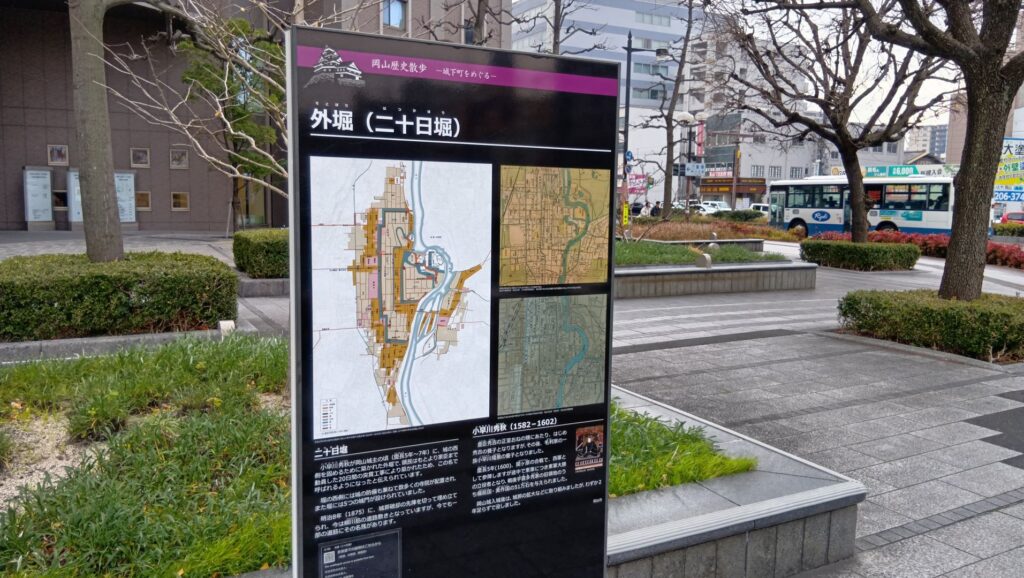
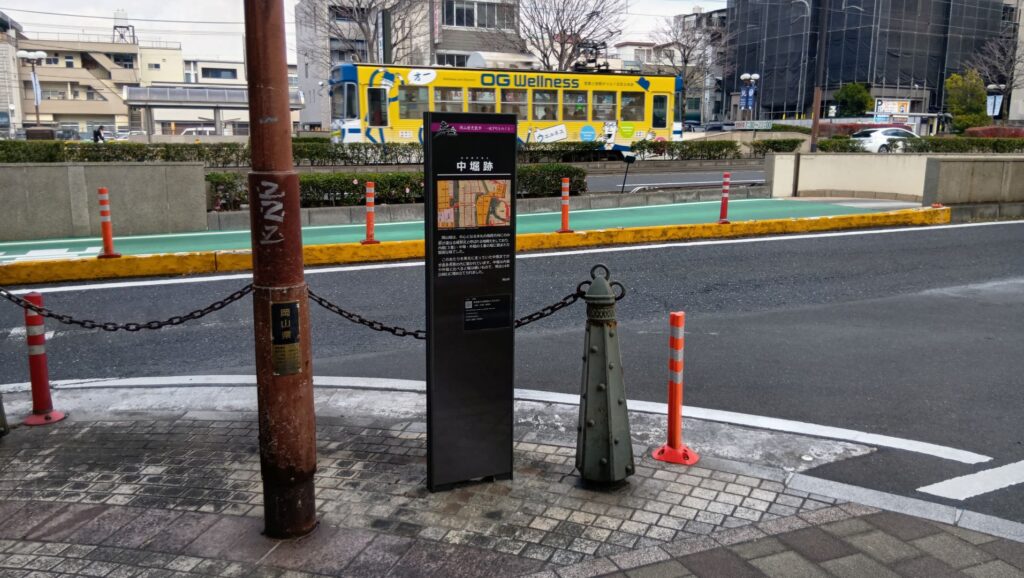
If you go straight along Momotaro-Odori Street from the station, you will eventually find the area around the street turning into the city area. However, you will also find some explanation panels which say there were the outer moat or the middle moat.

The ruins of the outer moat
The ruins of the middle moat

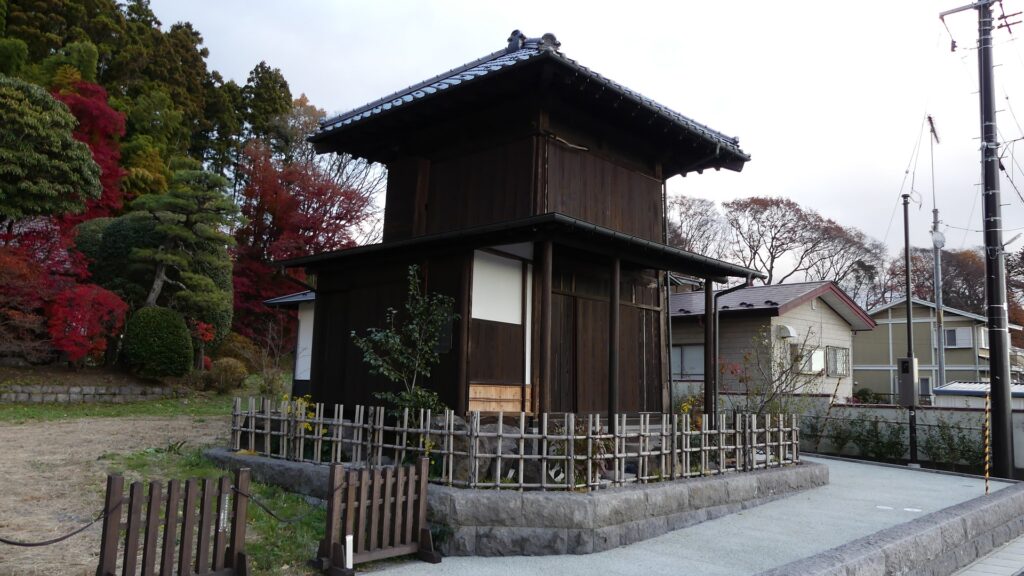
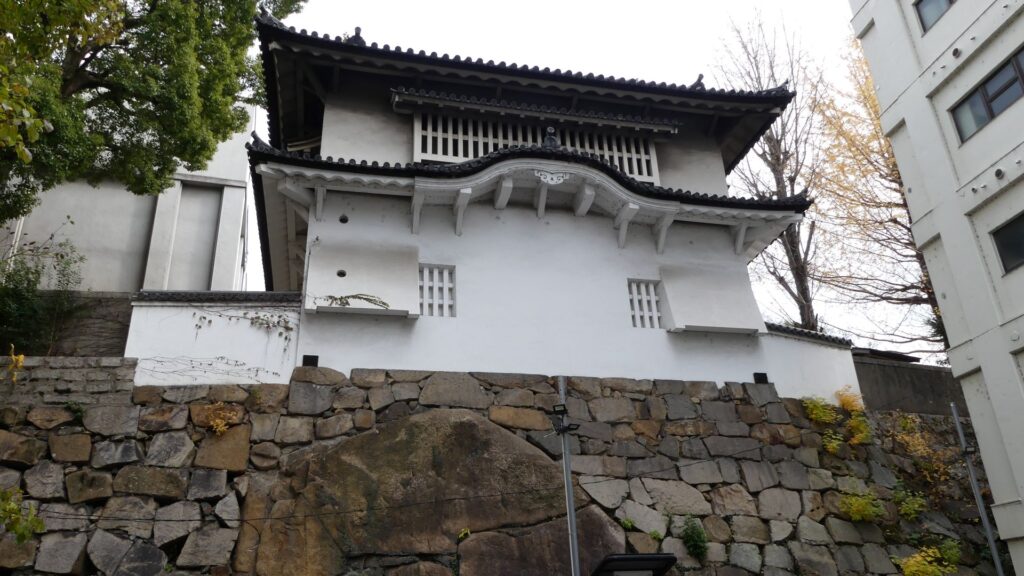
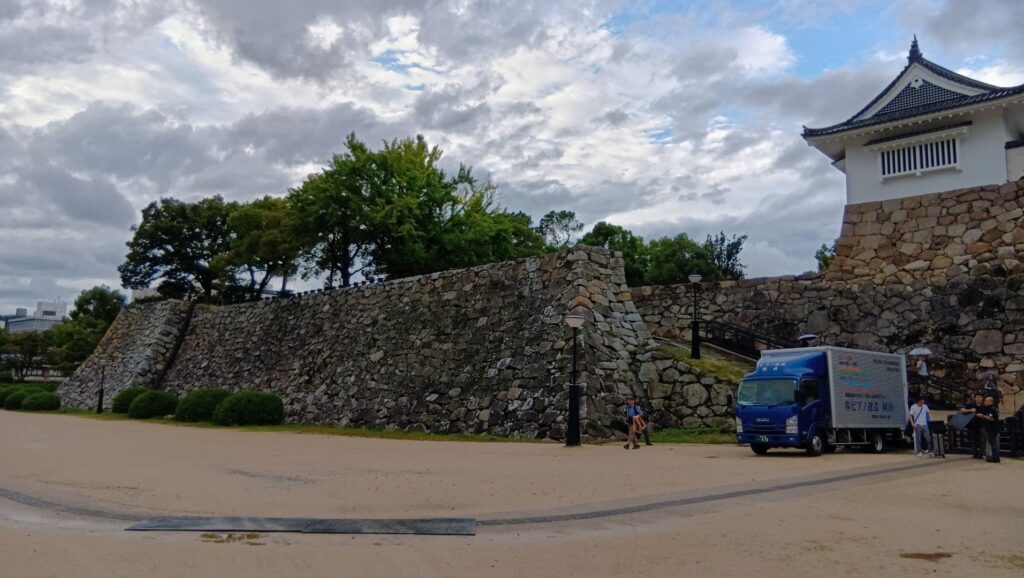
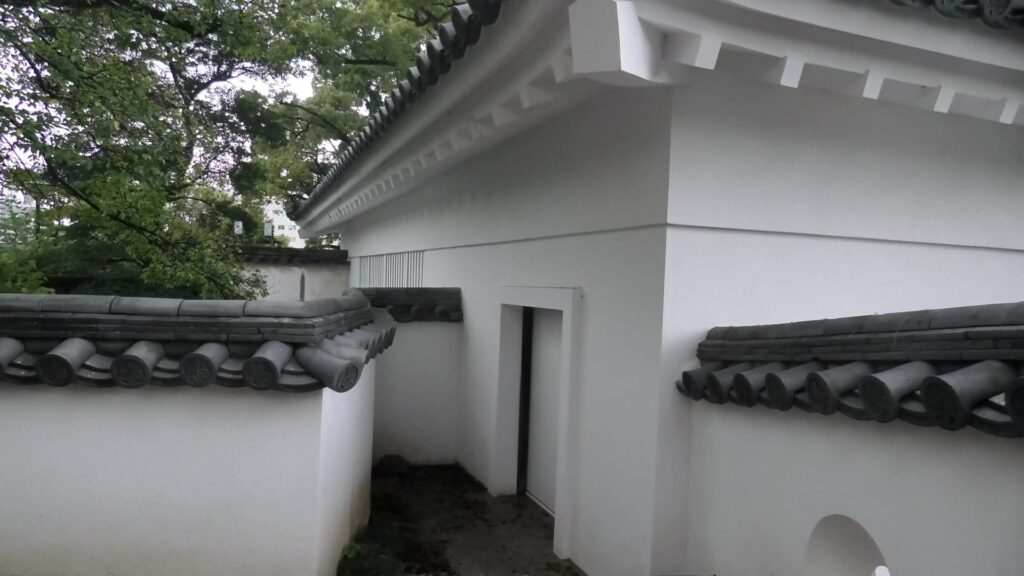
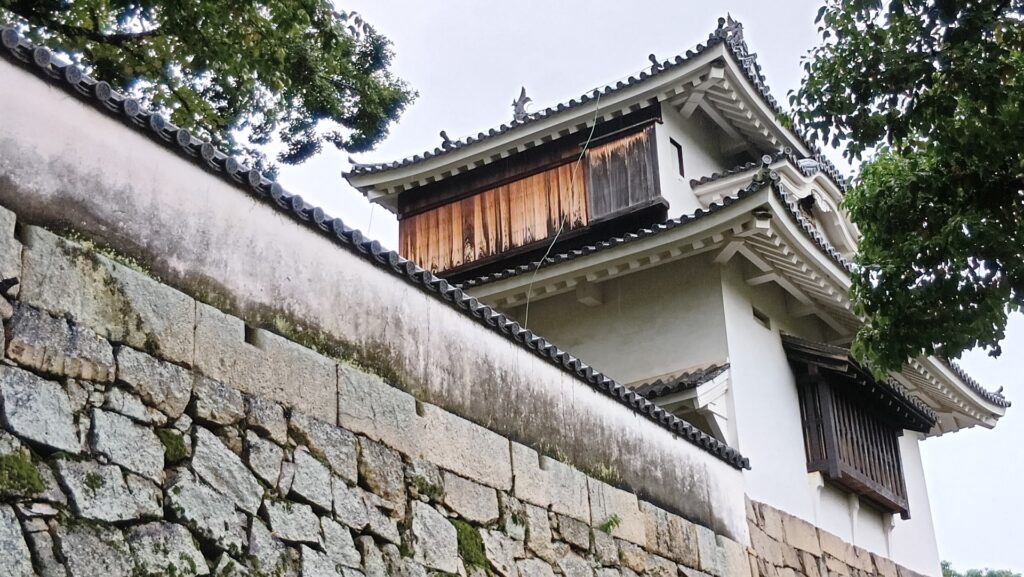
You will eventually arrive at the end of the street, which was inside the inner moat in the past. I recommend you turn to the right because you will soon see the Nishite Turret on the western enclosure, which is one of the few remaining buildings of the castle. It has been designated as a National Important Cultural Property. The turret stood facing the moat.

The end of the street, Going left or right will lead you to the castle, but I highly recommend turning right in order to see the turret
The Nishite Turret on the western enclosure

Let us next walk around the western enclosure along the current roads. You will see the remaining stone walls of the enclosure along them. The roads you are walking on were the moats around the enclosure. You will eventually reach the ruins of Ishiyama-mon Gate. Its gate building was unfortunately burned down during World War II. The entrance of the gate was connected by a bridge on the moat to the outside in the past.

The stone walls of the western enclosure
The ruins of Ishiyama-mon Gate

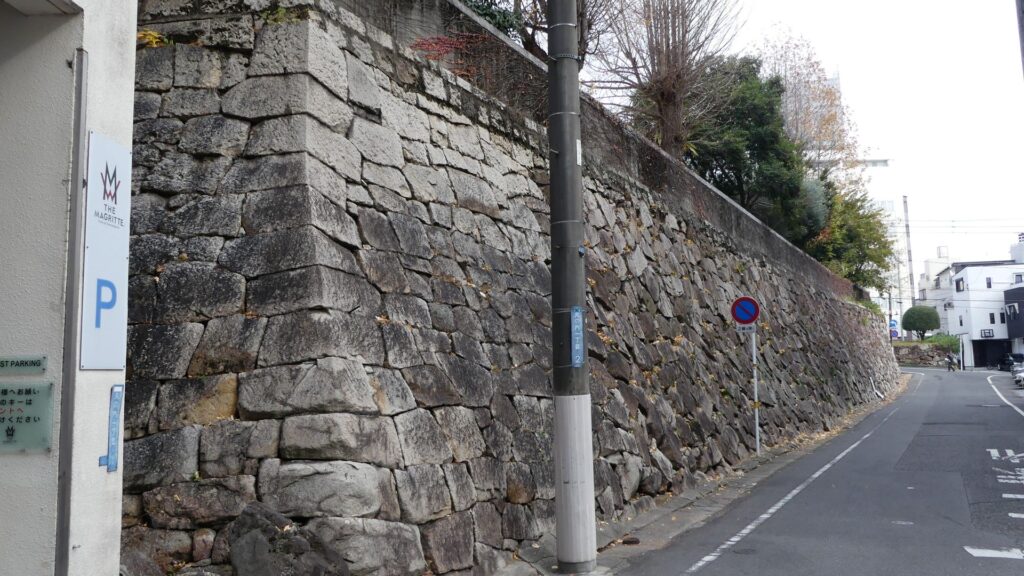
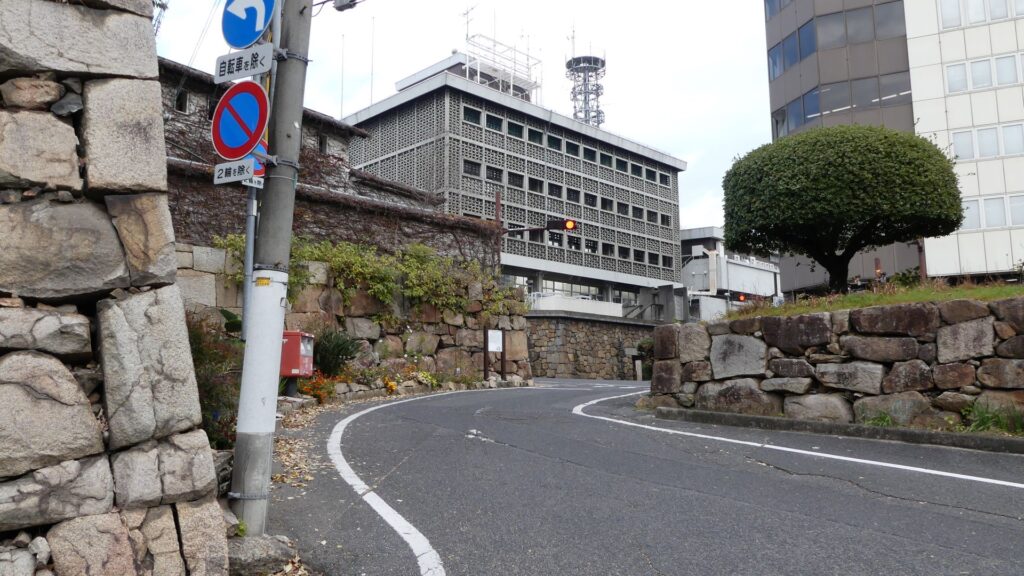
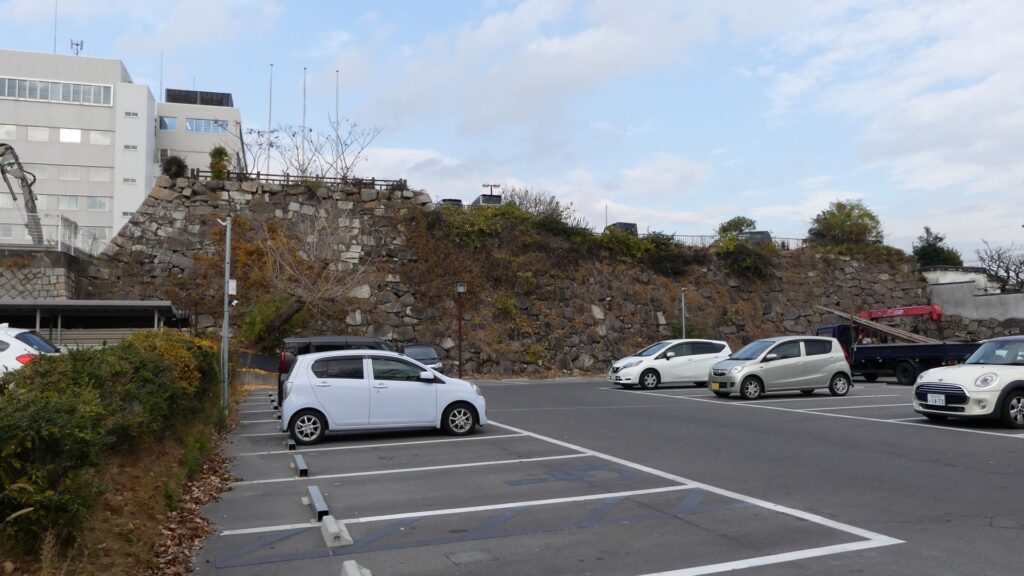
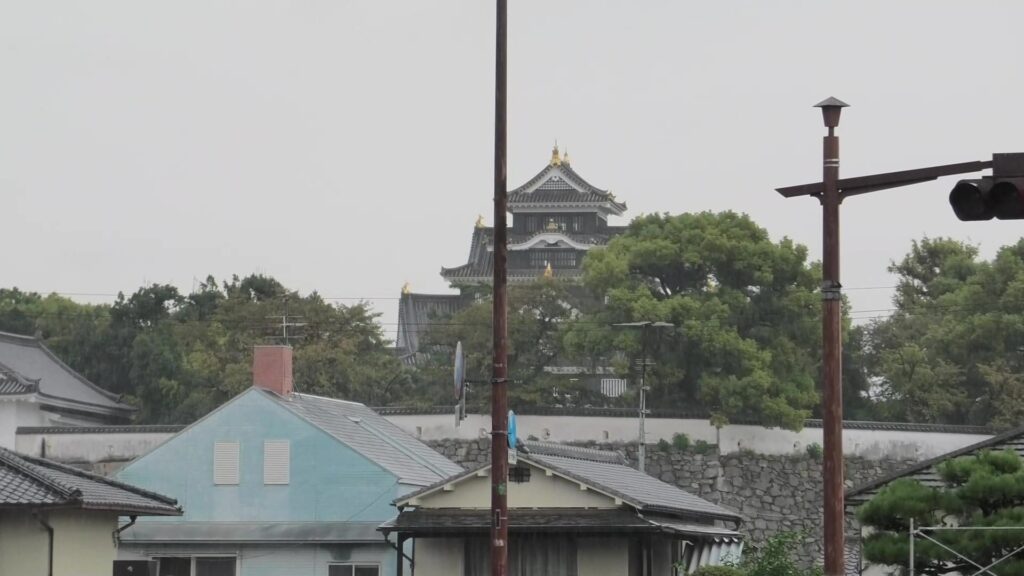
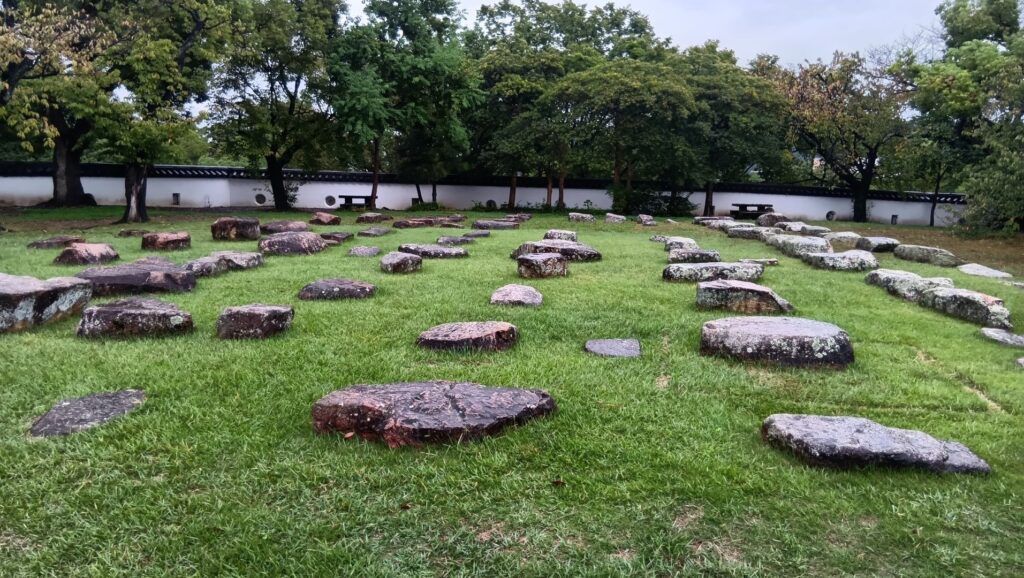
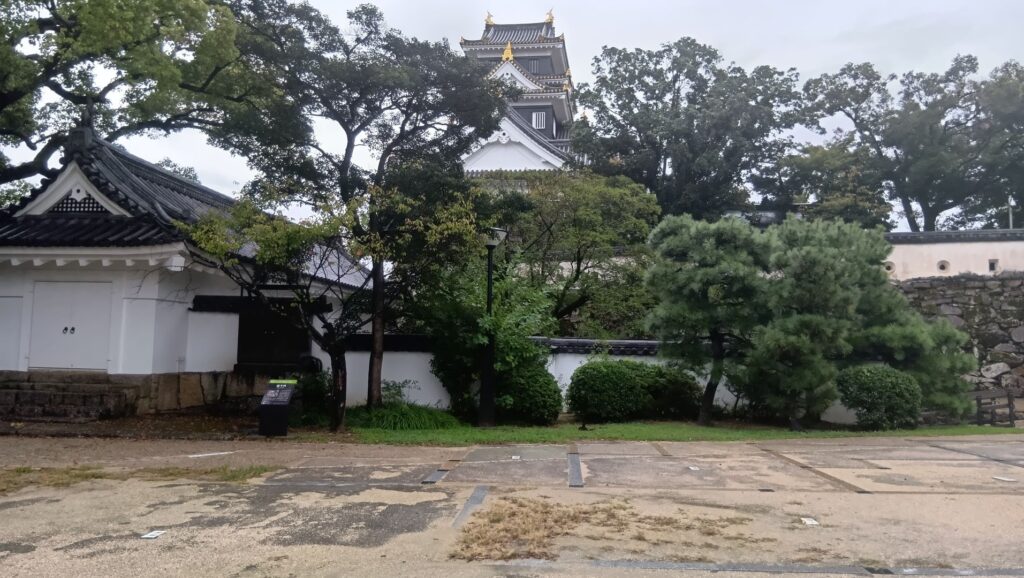
If you go further, you will see the birthplace of the castle, called “Ishiyama-no-shiro” (which means Ishiyama Castle). However, the stone walls around it were built during the period of the Ikeda Clan, which was much later than when it had been born. If you go around it to the eastern entrance, you will notice it is used as a parking lot now. An interesting thing there is the view of the main tower from the west, which looks very narrow.

The Ishiyama Castle, just behind the stone walls is Ishiyama Castle. The top of the walls is also used as parking lot
The eastern entrance of the Ishiyama Castle, Notice the incline leading up to the castle
The main tower seen from the west

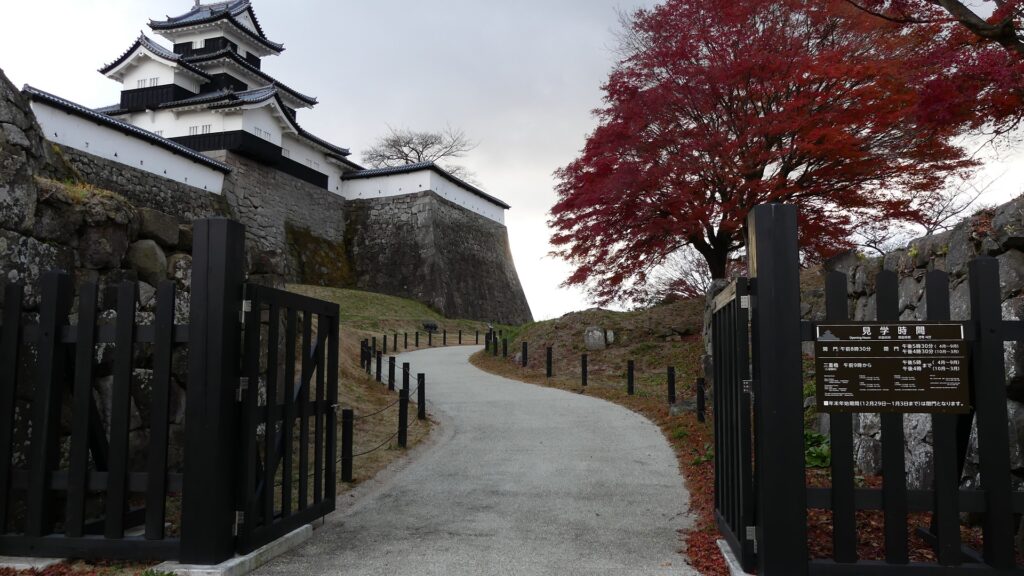
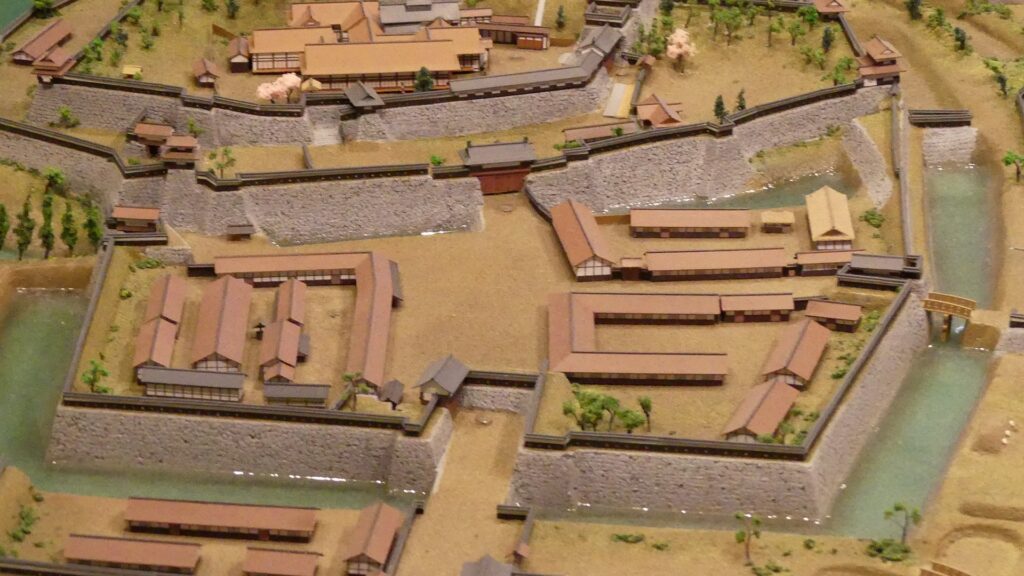
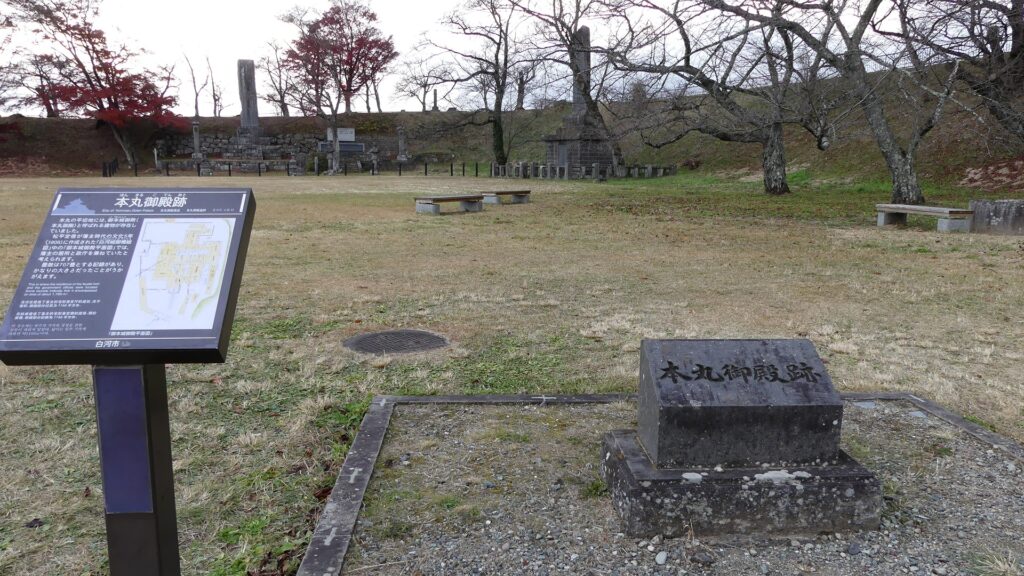
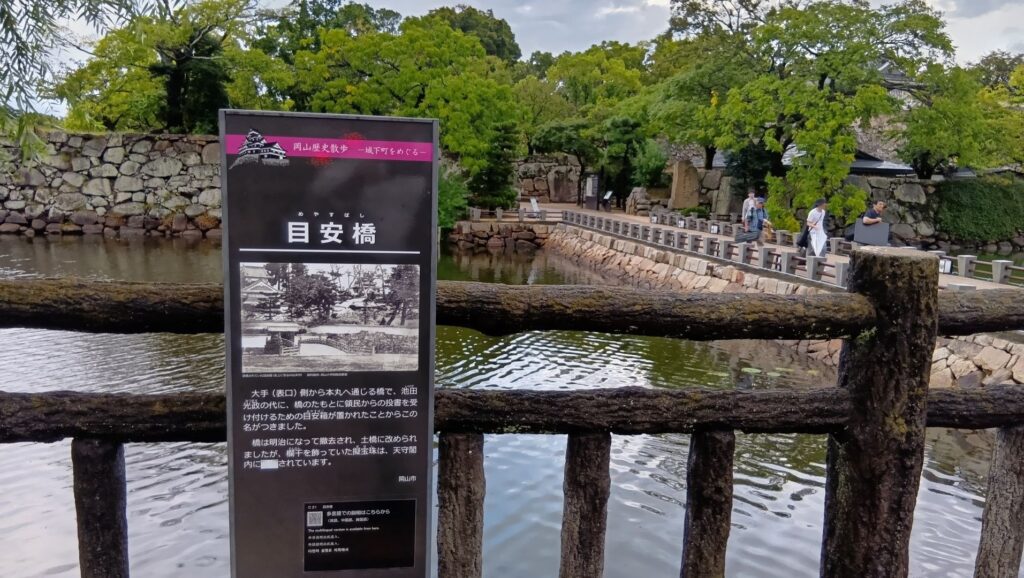
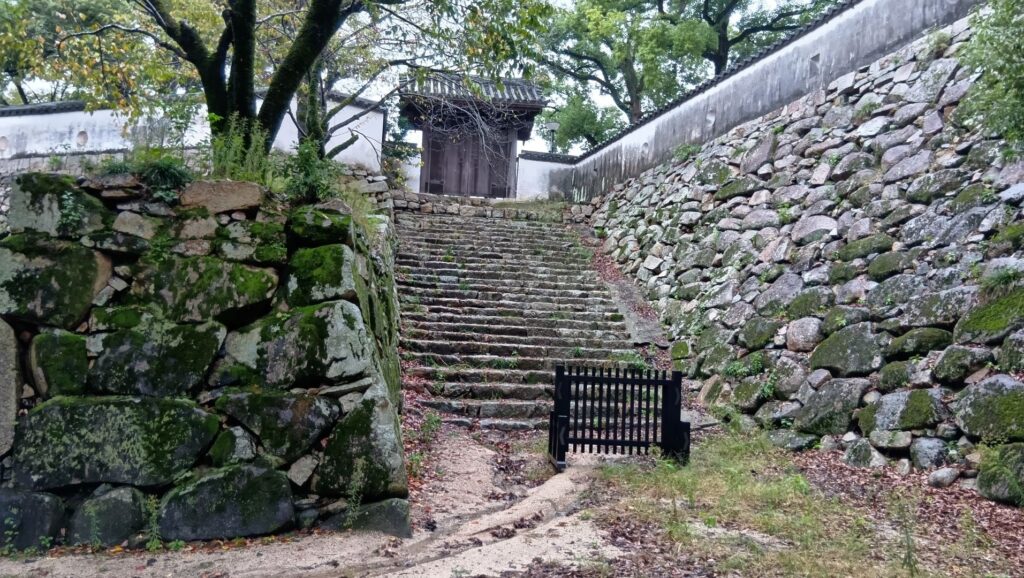
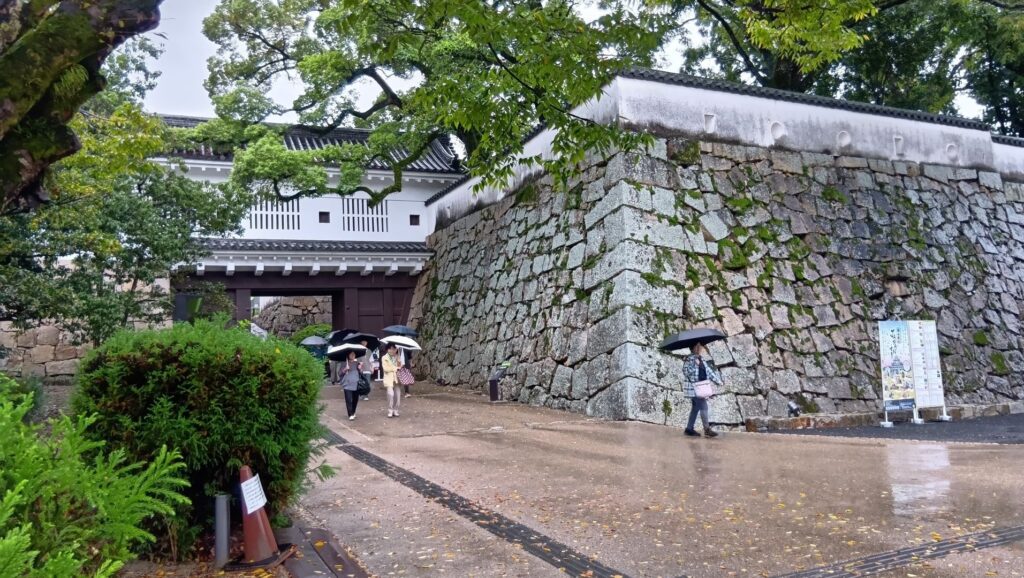
You will finally arrive at the main enclosure of the castle. You can go across the bridge over the inner moat, called “Meyasu-Bashi”. The front gate, called “Uchigeba-mon” has a square space being surrounded by its stone walls, called Masugata, though its building didn’t survive.

The Meyasu-Bashi Bridge
The front gate

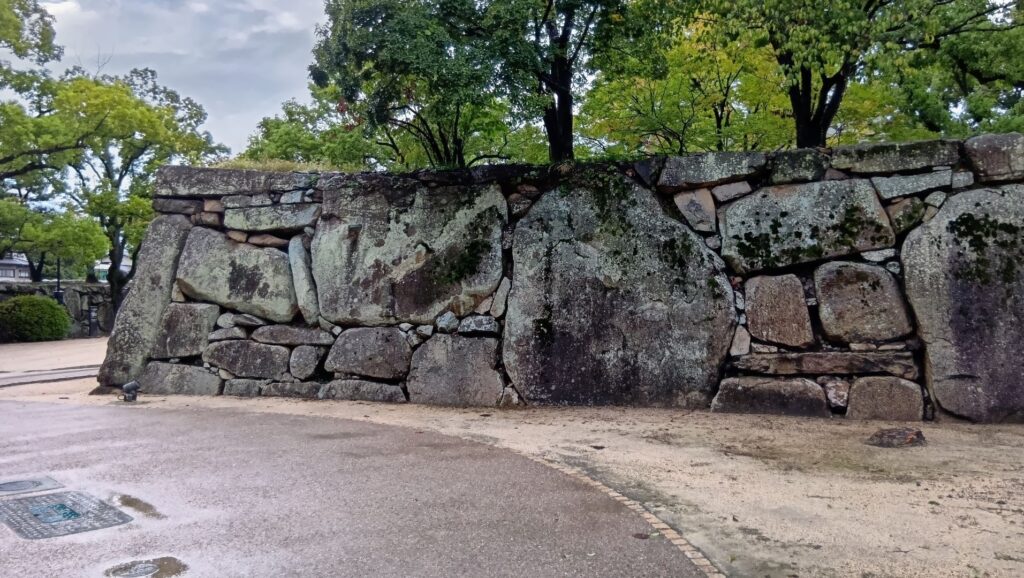
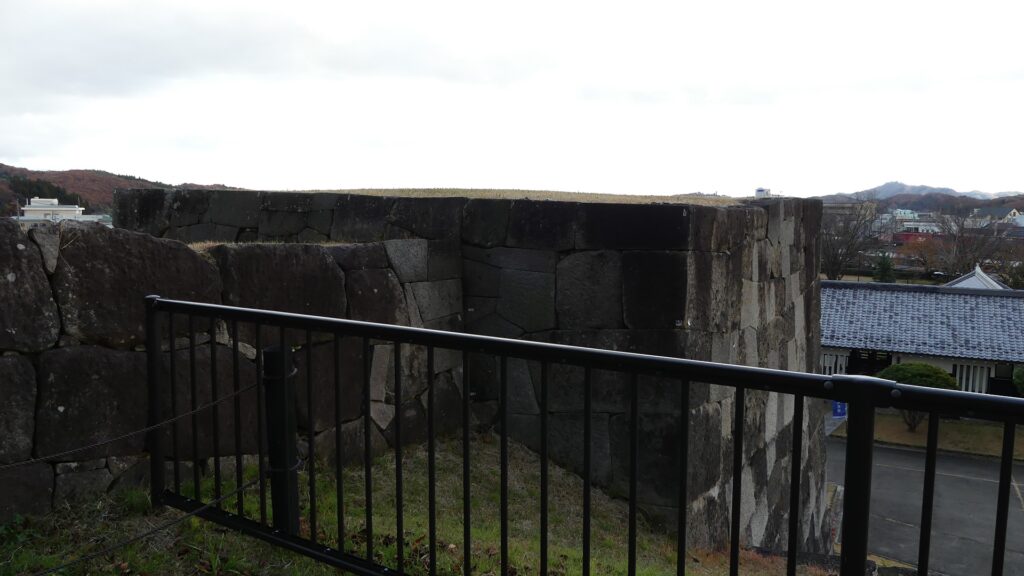
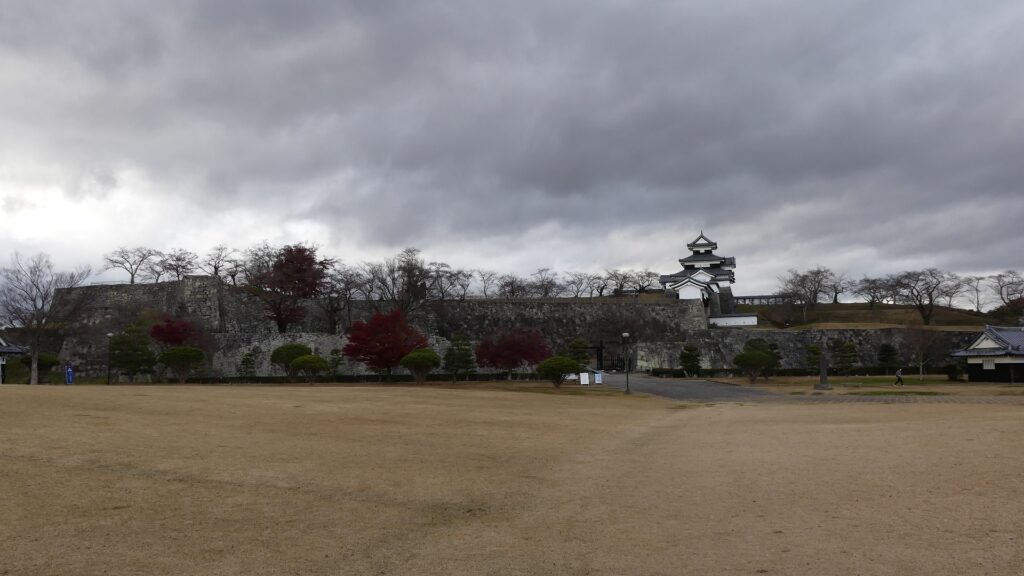
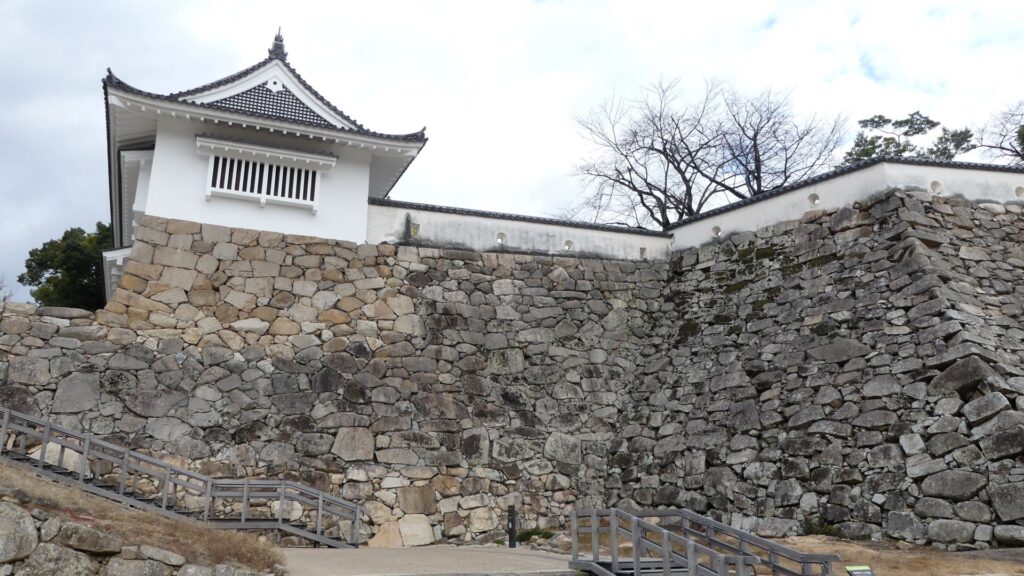
The main enclosure has three tiers. They are called Hondan, Naka-no-dan, and Shita-no-dan from the top. The Naka-no-dan (which means the middle tier) has been extended during the Kobayakawa and Ikeda Periods. Therefore, the tier has mixed stone walls coming from both periods. If you walk on the lowest tier, the Shita-no-dan (which means the low tier), you will see the stone walls of Onando Turret. They were built during the Kobayakawa Period. The stone walls of the Hondan (which means the main tier) were also modified. When you see their connecting part to the middle tier, you will notice they look very complex. This was because the Kobayakawa and Ikeda Clans renovated them.

The ruins of Onando Turret
The stone walls of the middle tier seen from the lower tier

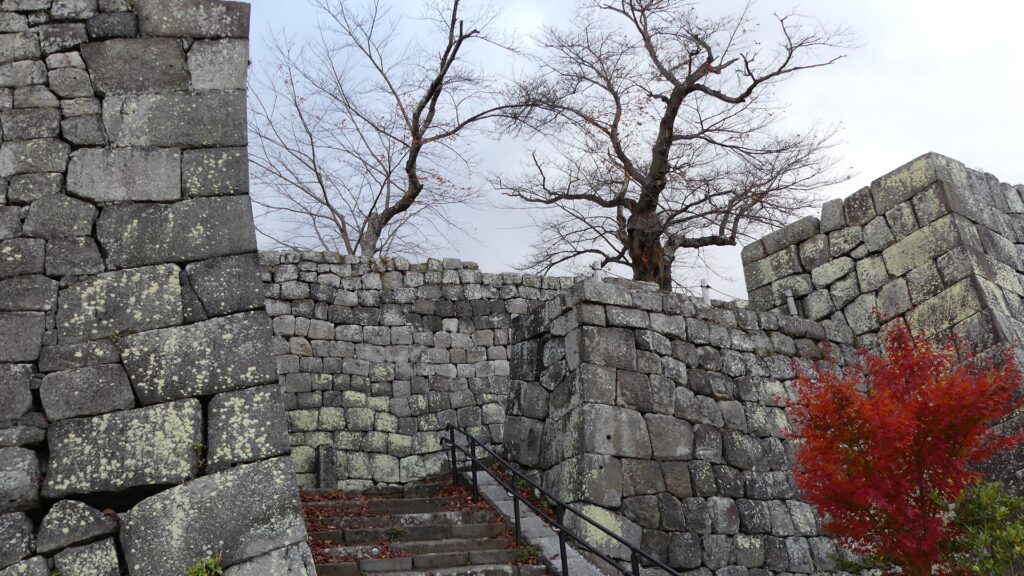
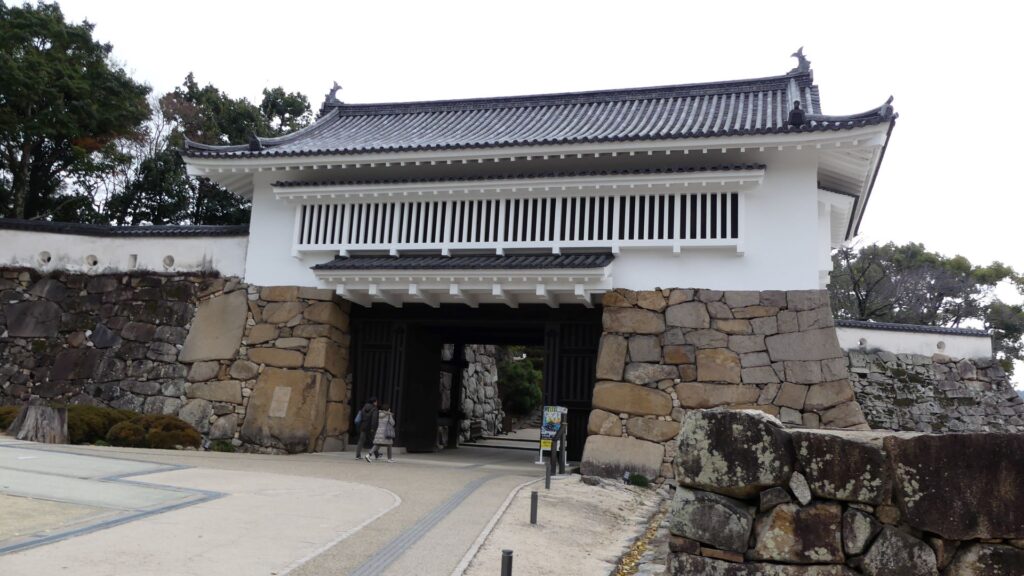
If you walk up on the ruins of Kurogane-mon gate, you will be at the middle tier. You will also see Akazu-no-mon Gate, the entrance of the main tier nearby.

The entrance to the middle tier on the left and the main tier on the right
The ruins of Kurogane-mon gate
The Akazu-no-mon Gate

The Course to the Back side along Asahigawa River

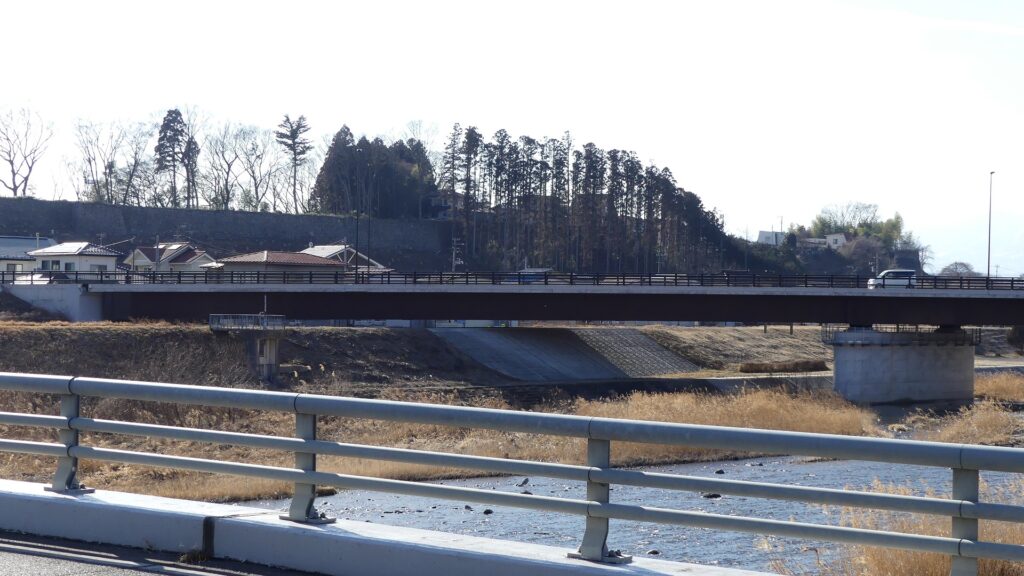
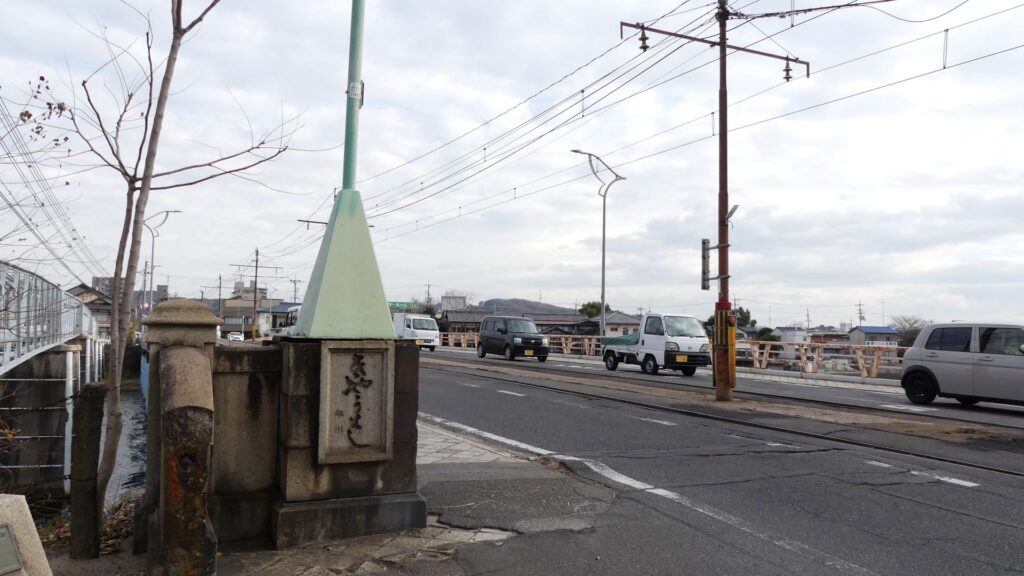
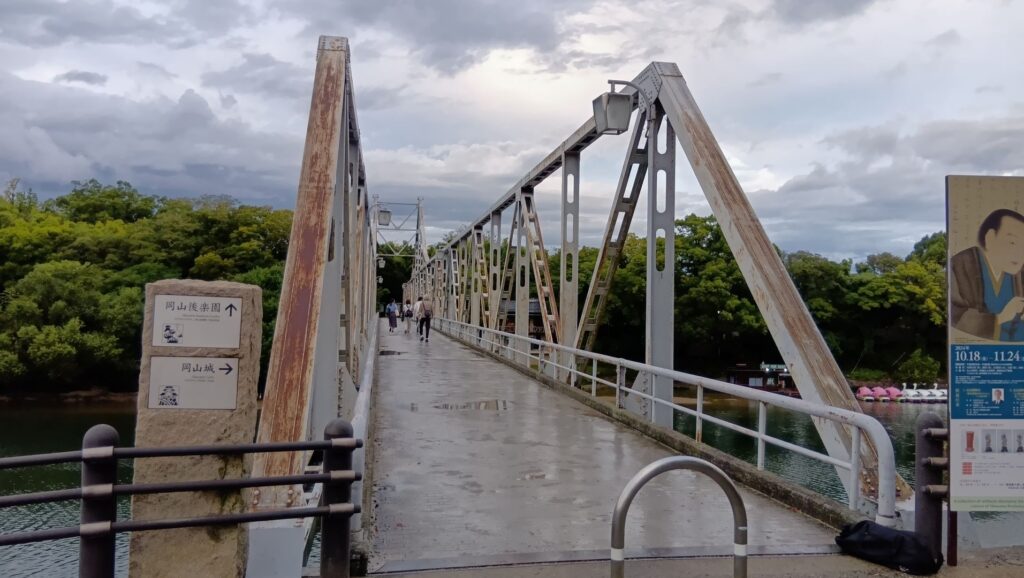
Our next course will start from Kyobashi Bridge over Asahigawa River. The bridge was first built during the period of Hideie Ukita.

The Kyobashi Bridge
The piers of the Kobashi Bridge which were used during the Edo Period and are exhibited near the current bridge

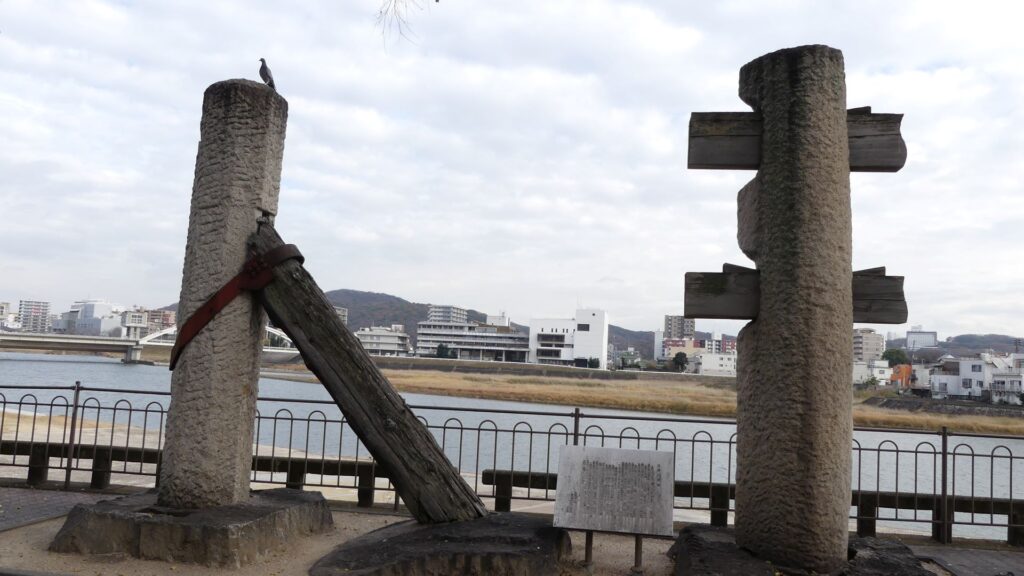
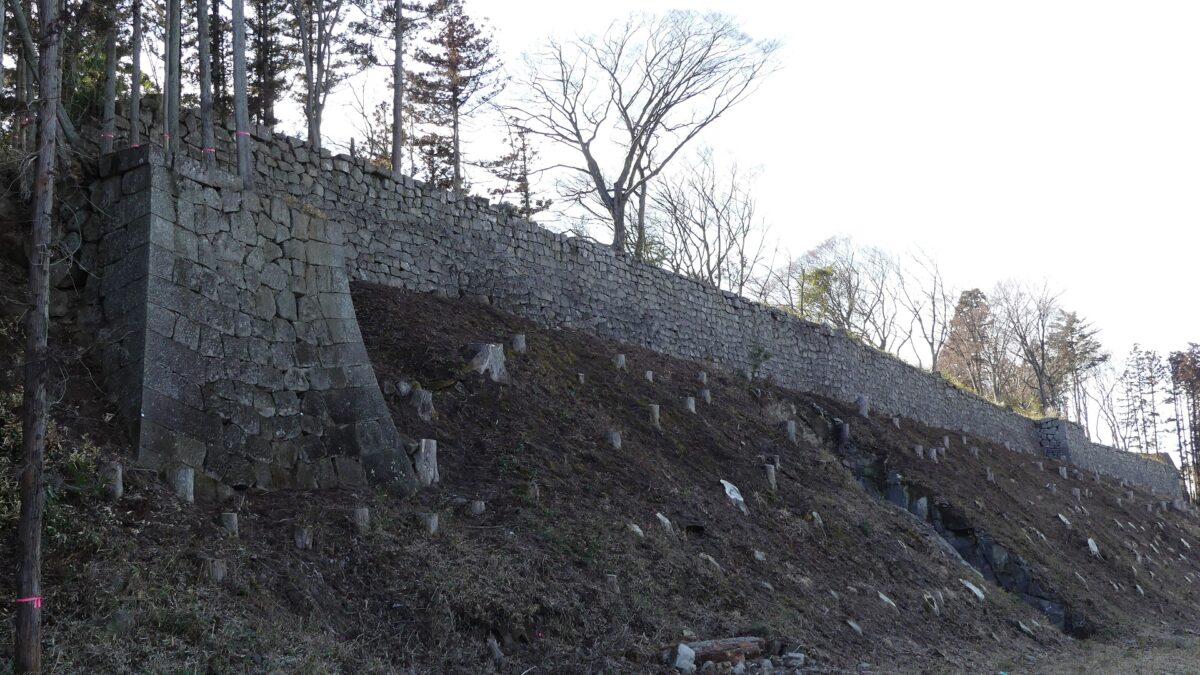
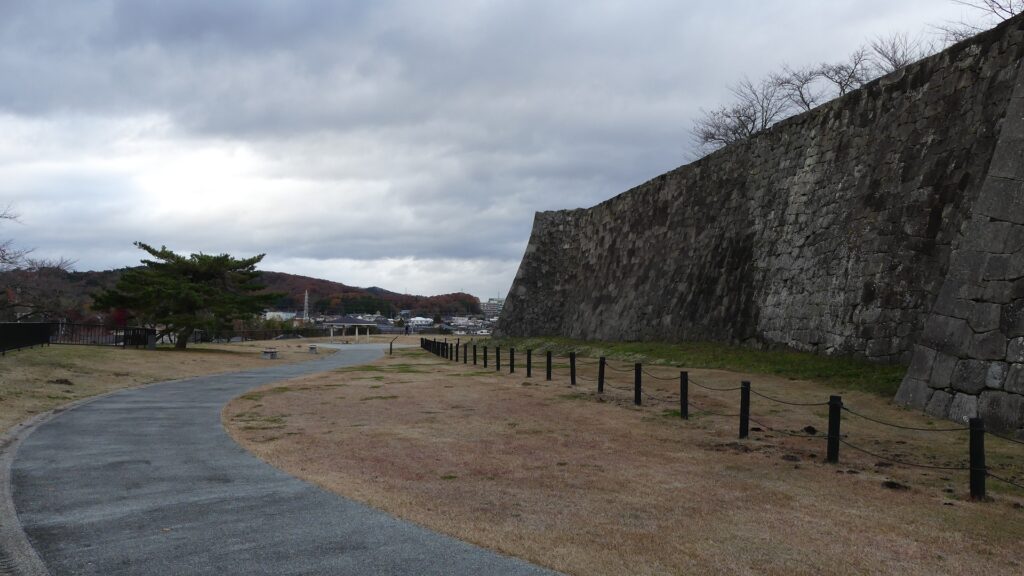
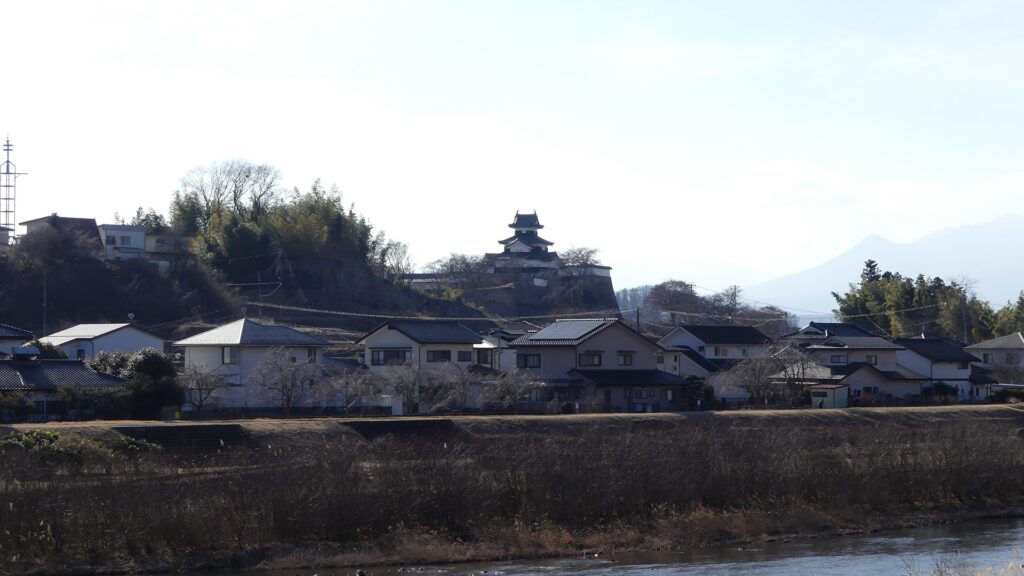
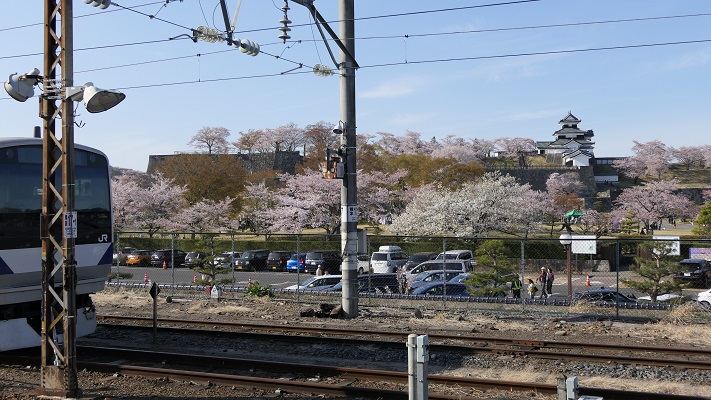
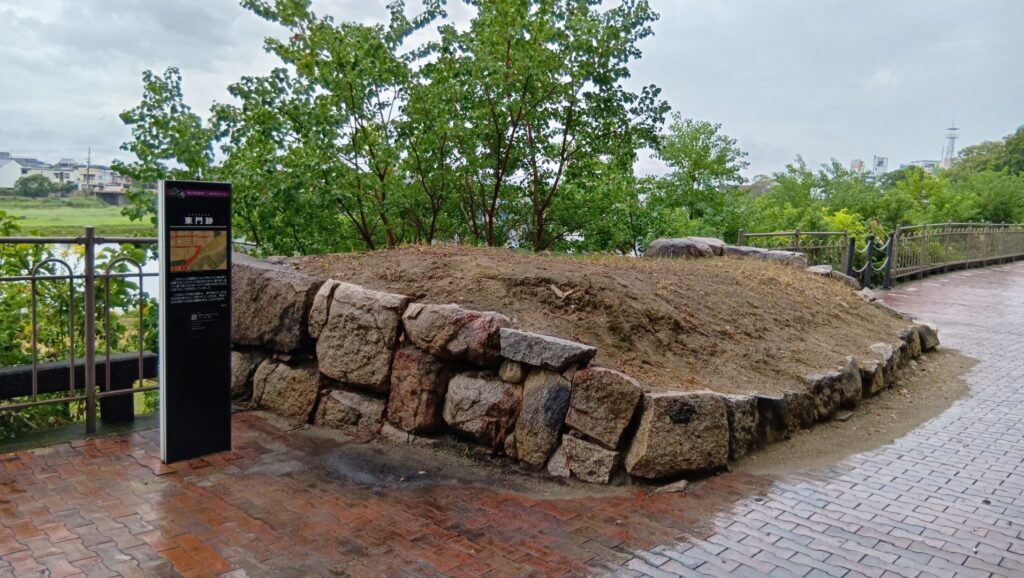
If you go on the riverside, you will see the ruins of the eastern gate and Soken-yashiki Turret. They are over 500m away from the center of the castle, so you can imagine how large the castle was. You will then find other ruins of a turret, which was located in a senior vassal’s residence at the second enclosure. The total number of the turrets were 30! You will eventually see the distant view of the main tower.

The ruins of the eastern gate,the ruin is not surrounded by a gate, so you might be tempted to step on the ruin.  Please don’t because it could be dangerous
The ruins of Soken-yashiki Turret, I wonder what the number on the ground mean.
The ruins of the turret, which was located in the senior vassal’s residence
The main tower seen from the south

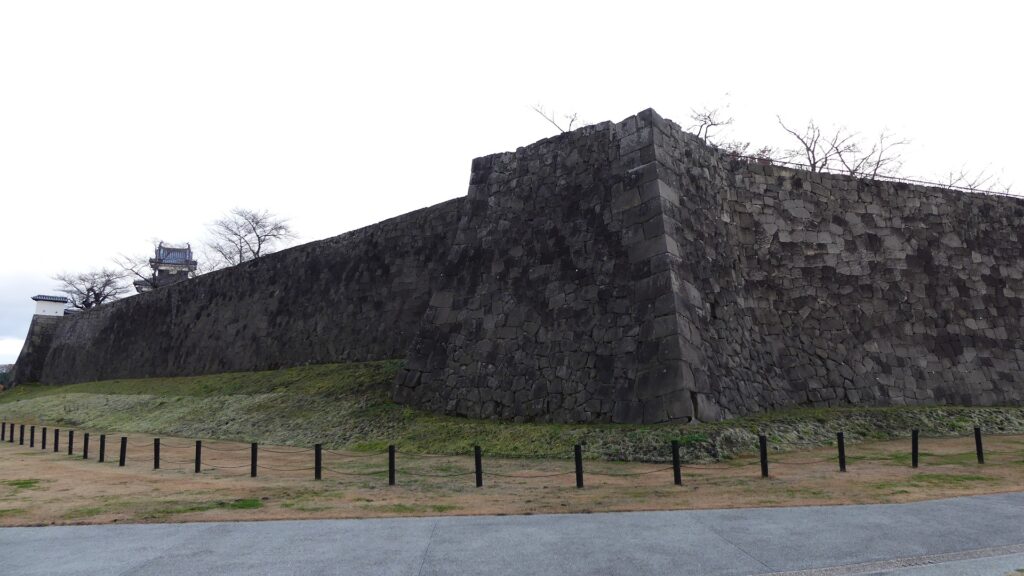
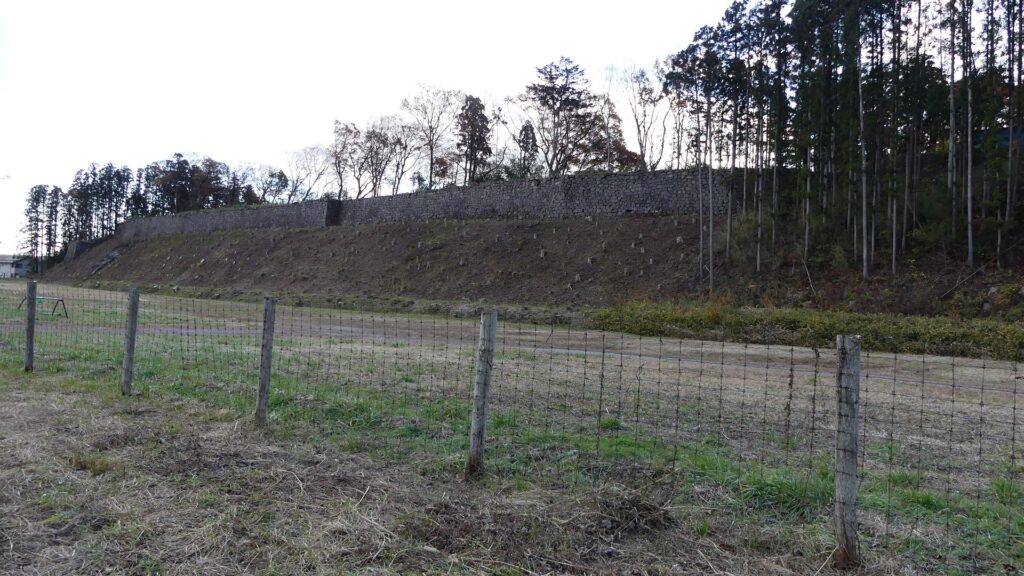
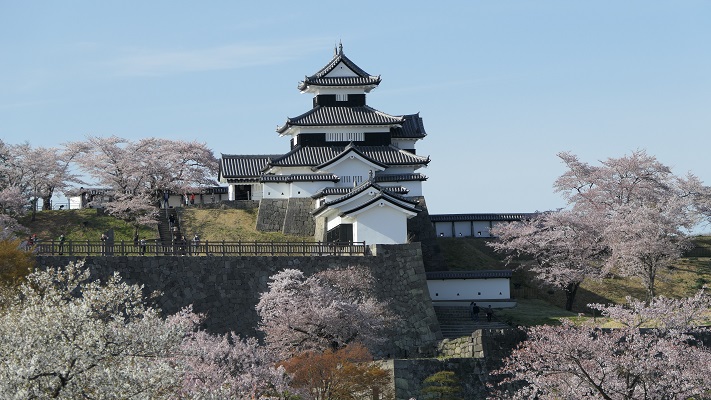
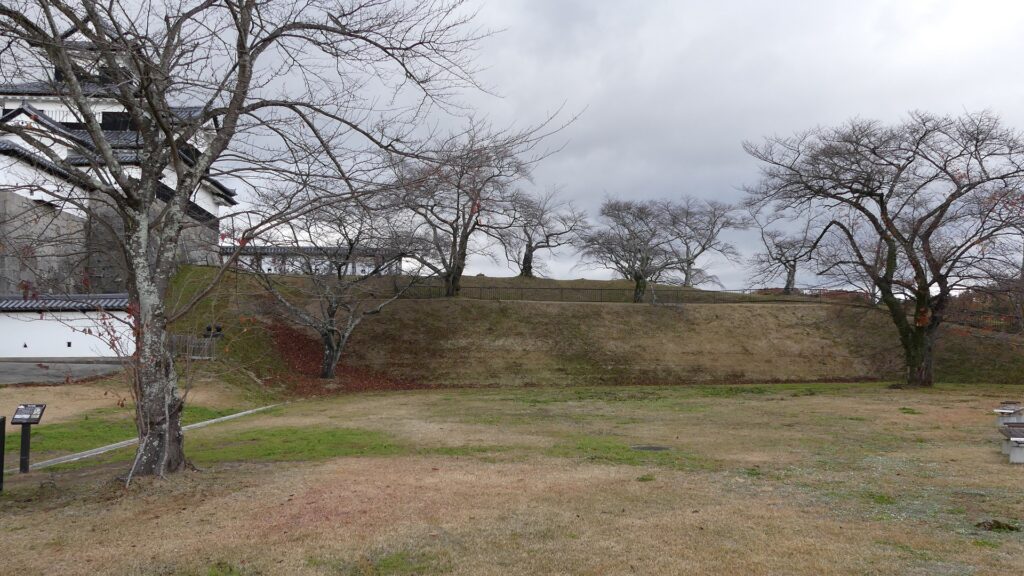
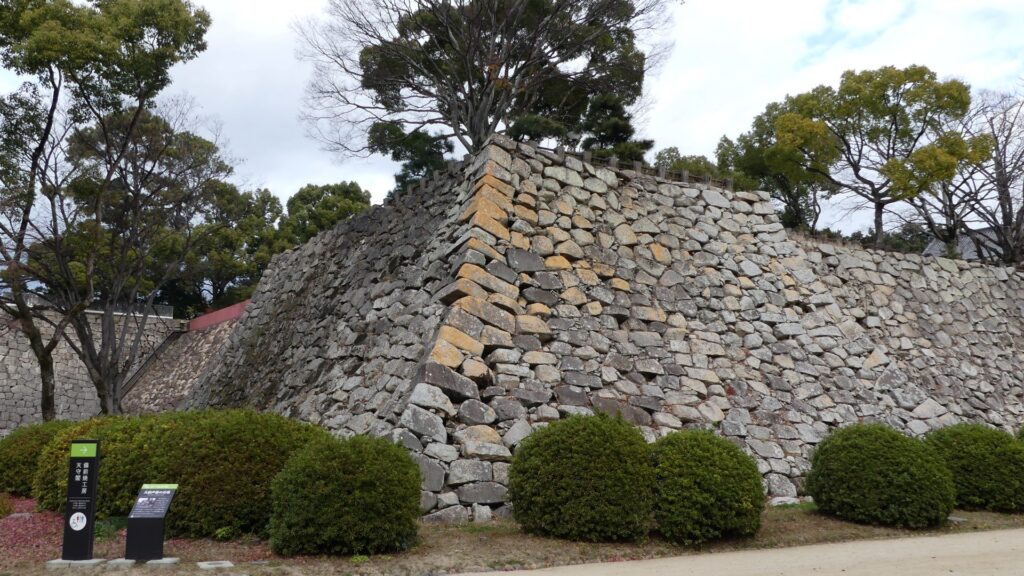
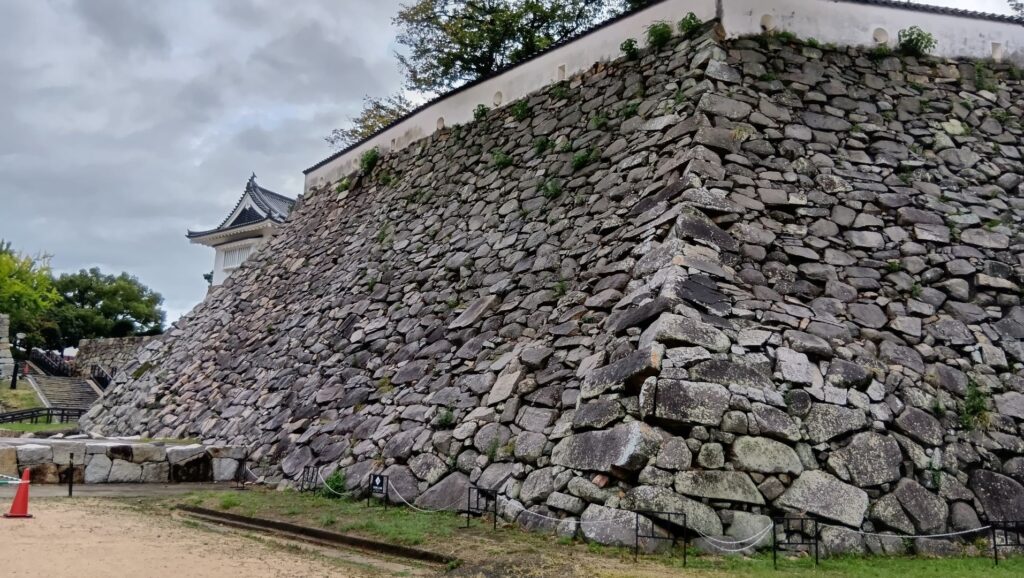
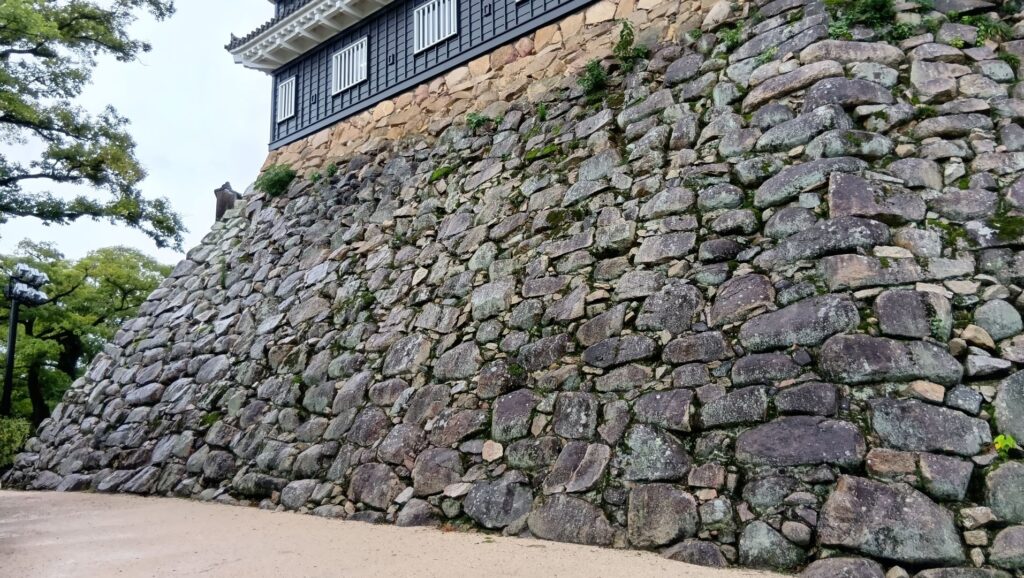
You should check out the amazing stone walls when you reach the main enclosure. They are called the high stone walls of the southeastern part of the main tier. They were piled up using natural stones in the method called Nozura-zumi during the Ukita period. Their height is about 15m which was one of the highest stone walls at that time. They look like those of Azuchi Castle, whose method was probably mimicked by Okayama Castle.

The high stone walls of the southeastern part of the main tier.
The stone walls of Azuchi Castle; Notice the similarities between the corners of each wall having similar pilled up pattern

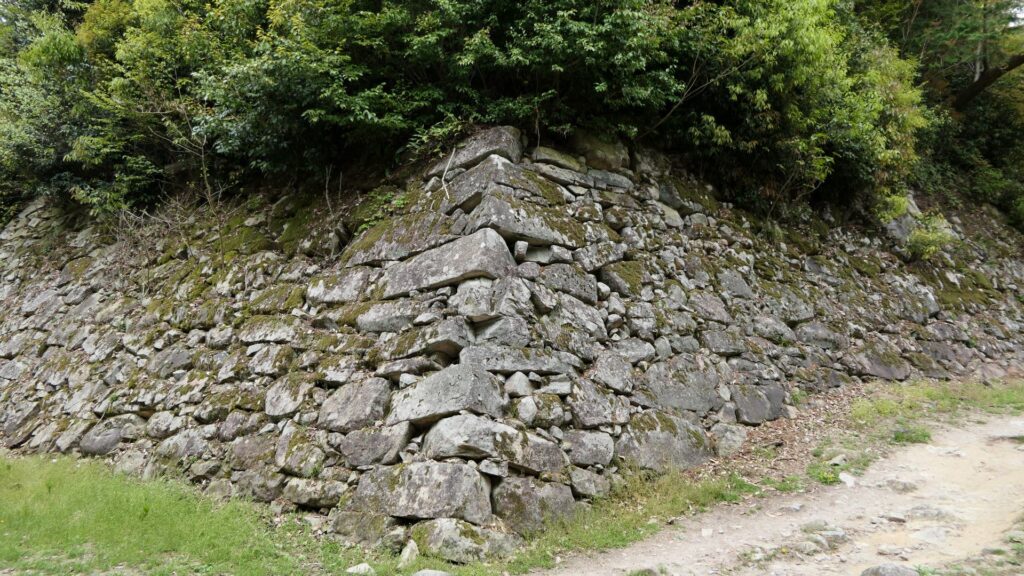
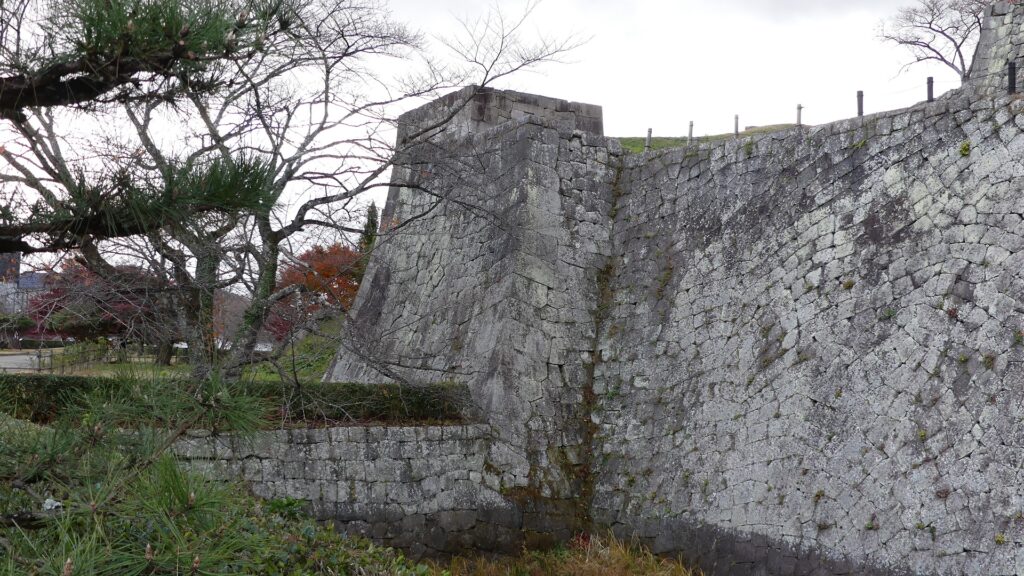
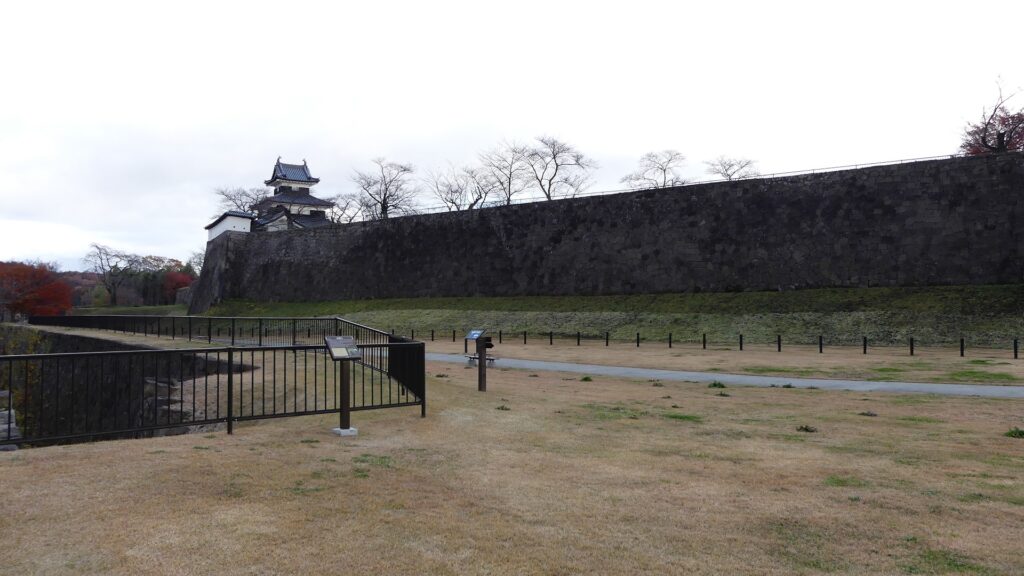
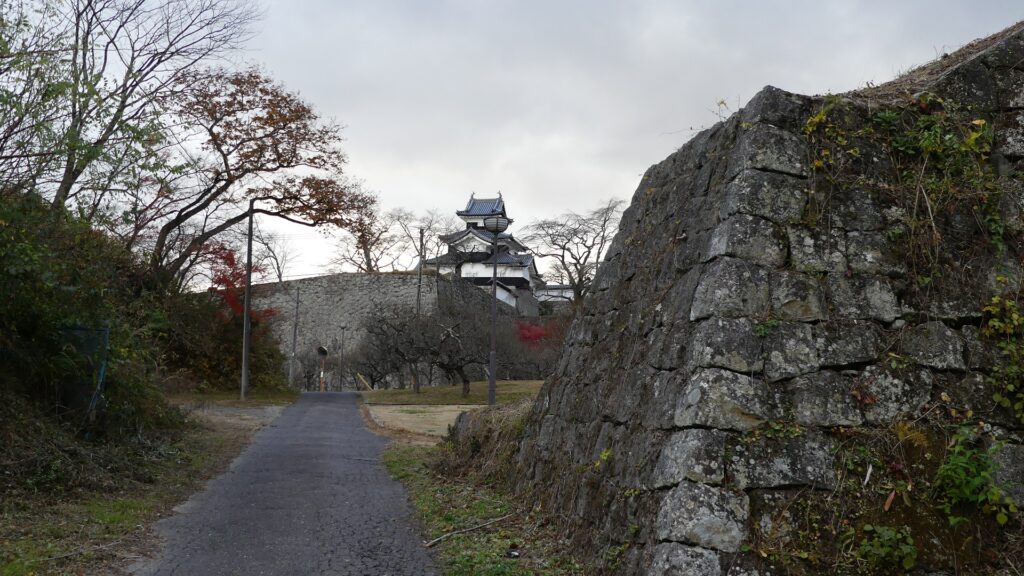
If you go further along the river towards the main tower, you will eventually find the joint section of the stone walls of the Ukita and Kobayakawa Periods. The sizes of the stones used during the Kobayakawa Period were smaller than those used in the Ukita Period. The reason for it is uncertain however, but it might have come from an urgent construction by the Kobayakawa Clan. You will eventually arrive at the stone wall base of the main tower after passing a gate which was built during the Ikeda Period.

The left side was built during the Ukita Period, and the right side of these stone walls were built during the Kobayakawa Period
The gate which was built during the Ikeda Period, Notice the partial metal gate sitting at the bottom of the stairs

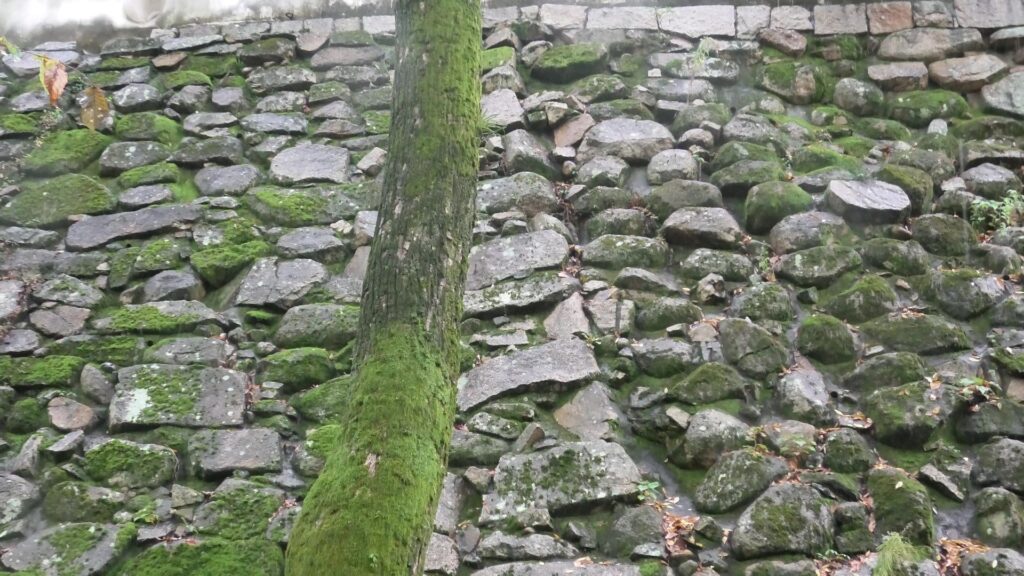
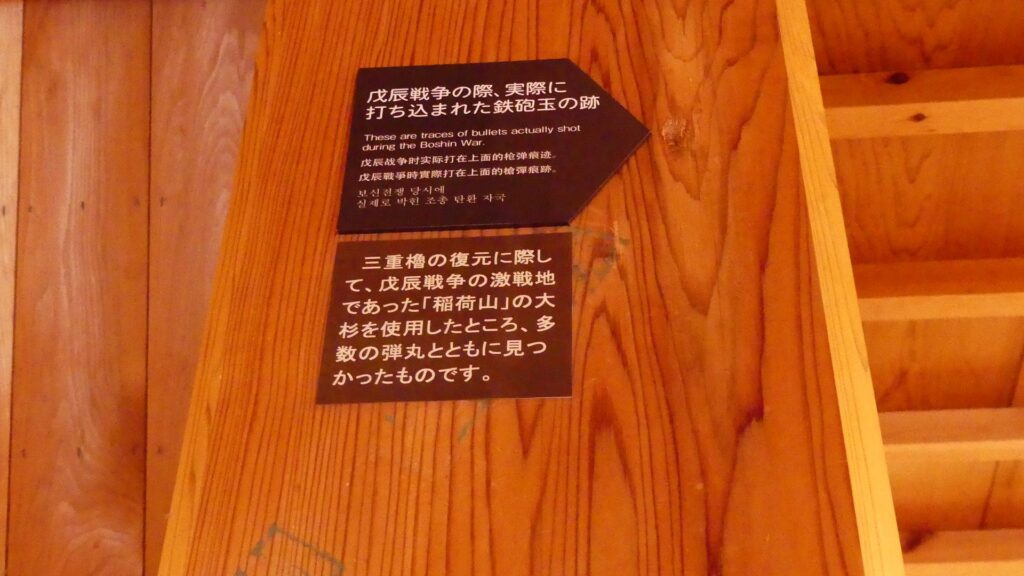
Many of the stones of the base look burnt. This was because the original main tower collapsed on this side when it was burned down by a US Air Raid during World War II. These stone walls are a living witness to the Japanese history.

The stone wall base of the main tower; Notice the top layer of the stone wall has a different color.  This top layer was added when the castle was renovated
Looking up at the main tower

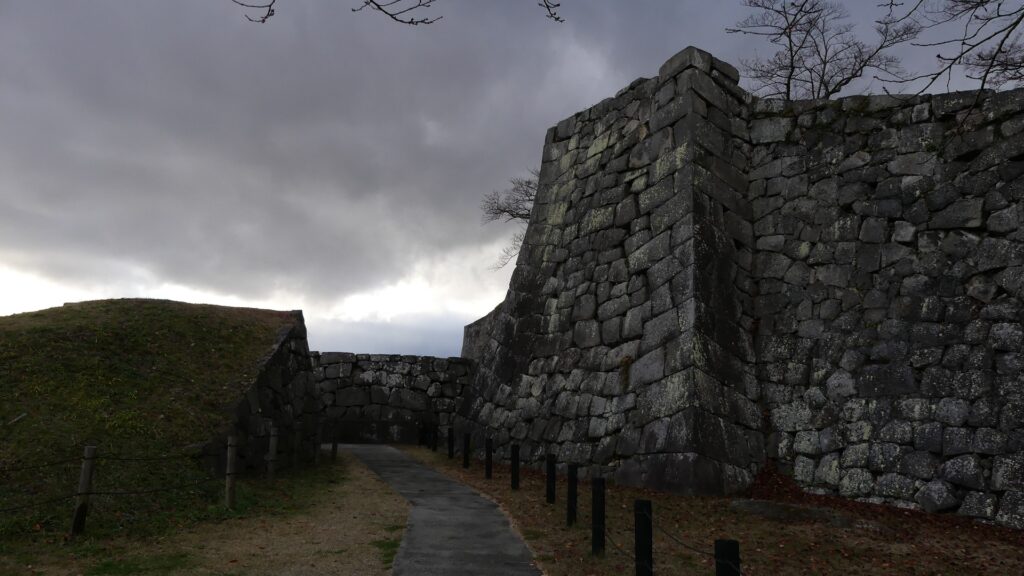
You will soon enter the rebuilt back gate of the main enclosure, called Roka-mon, near the main tower. The inside of the gate is the middle tier of the enclosure.

The main tower seen from a viewing spot
The Roka-mon Gate

Visiting the Main Tower and the Main Enclosure

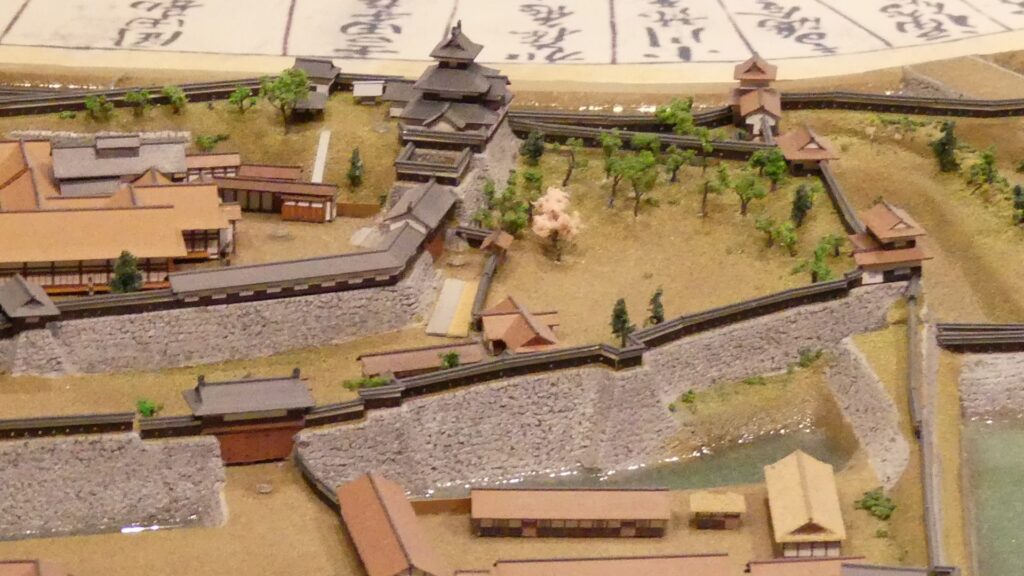
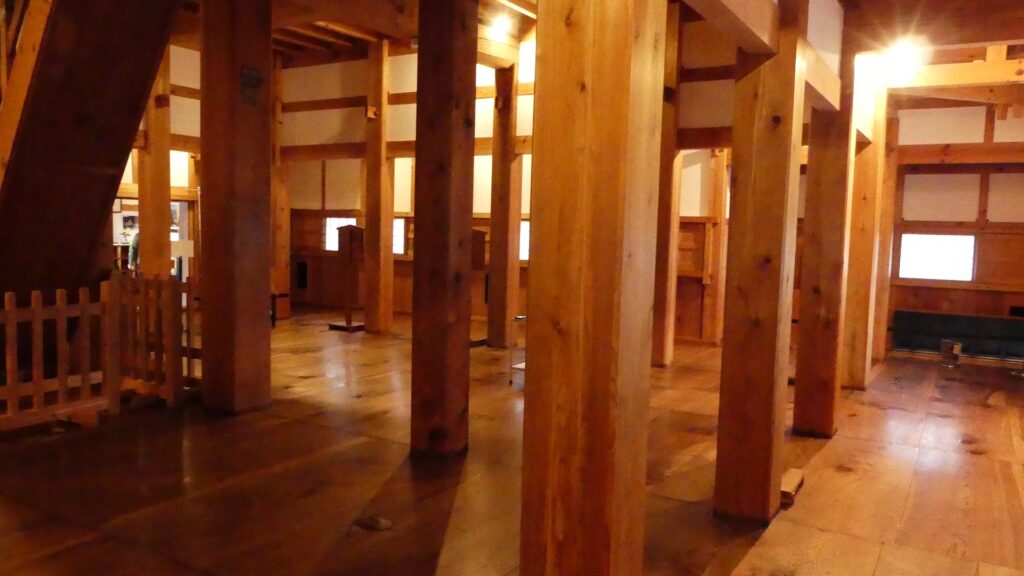
Let us next enter the main tier of the main enclosure through the Akazu-no-mon Gate (which means the closed gate). The main tier was exclusive to the residences of the lord, so the gate was usually closed, which was the origin of its name. You will see the stone foundations of the original main tower, which are exhibited on the tier. They were moved to the current positions when the current tower was built.

The Akazu-no-mon Gate
The stone foundations of the original main tower

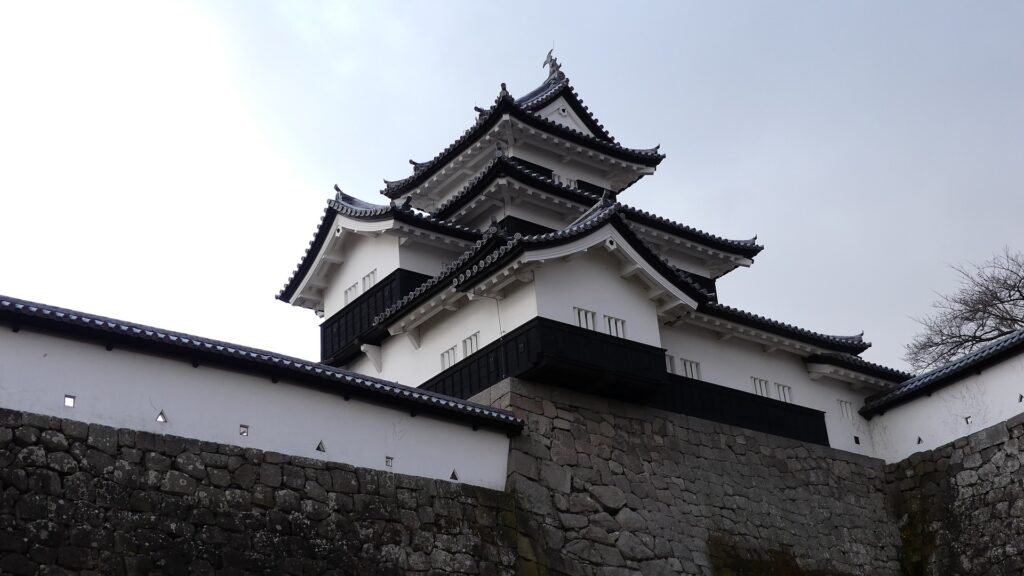
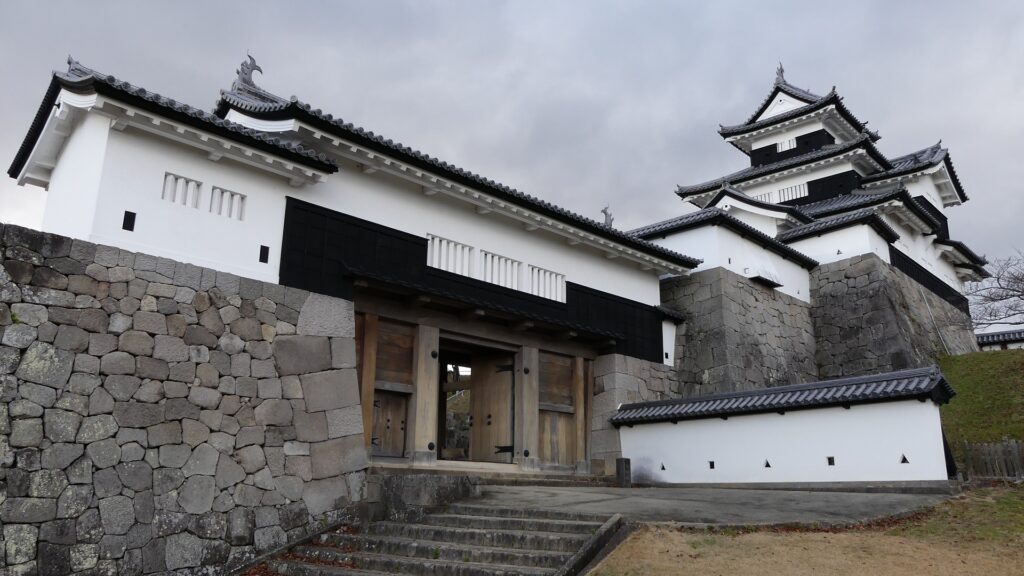
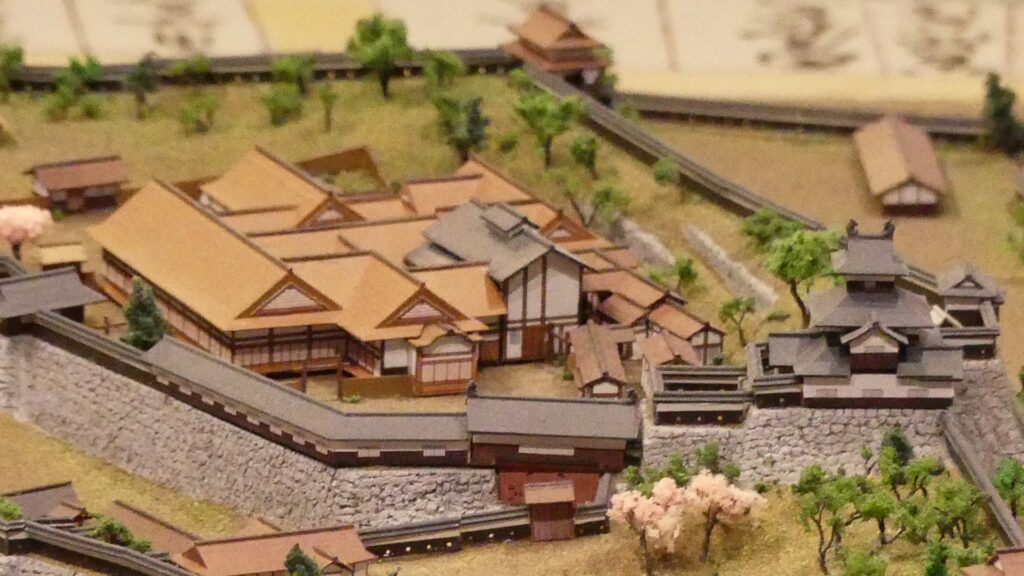
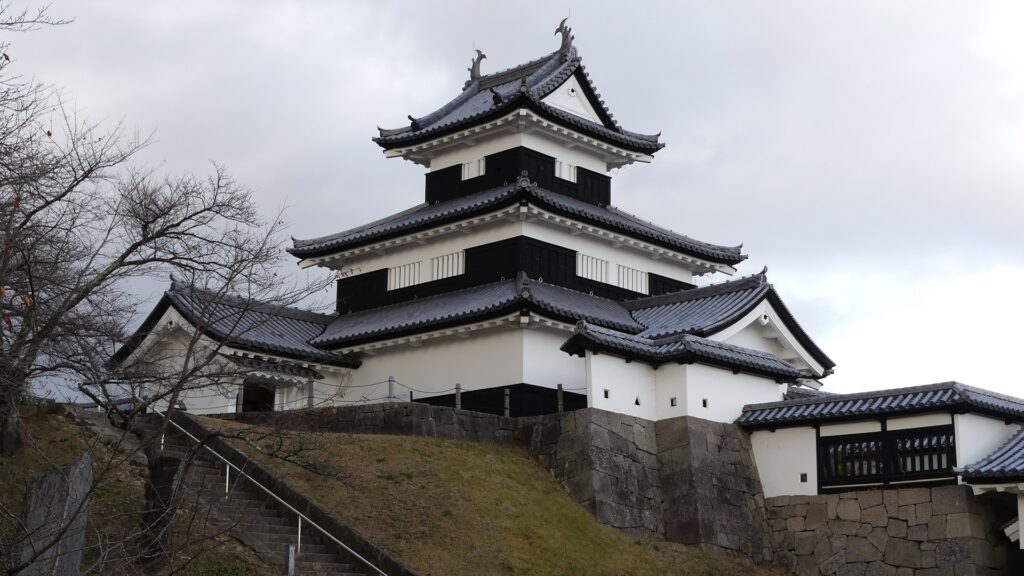
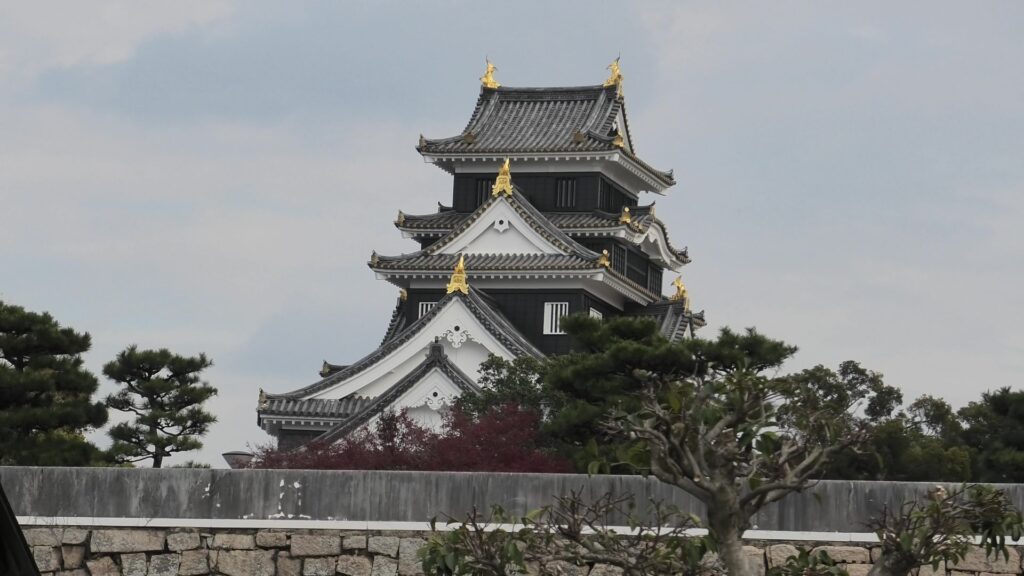
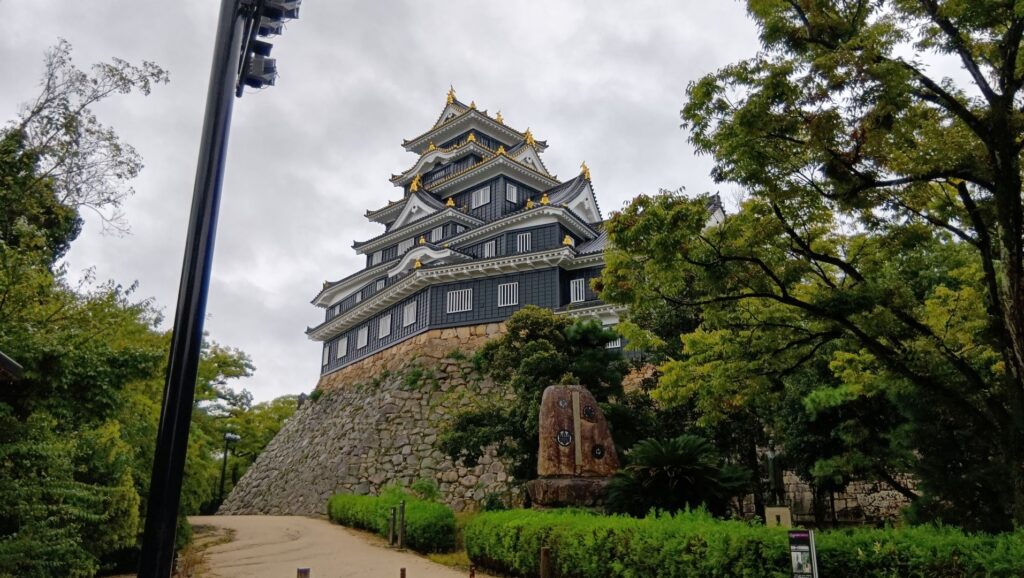
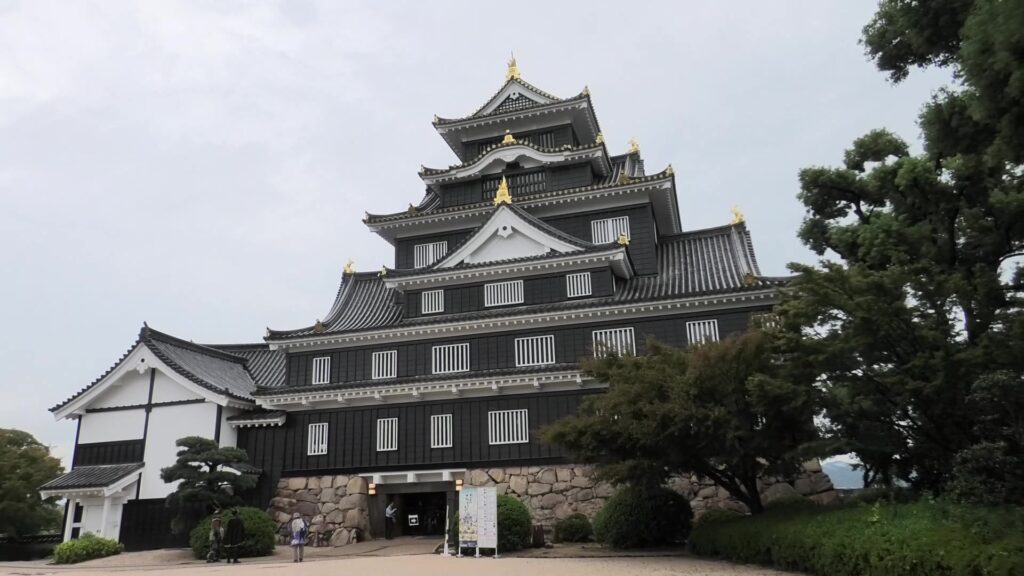
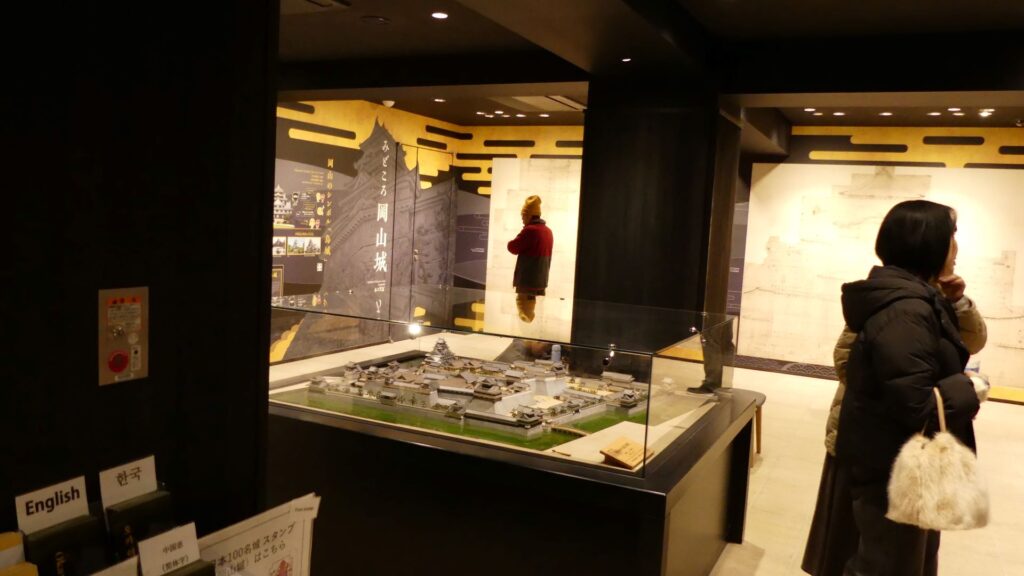
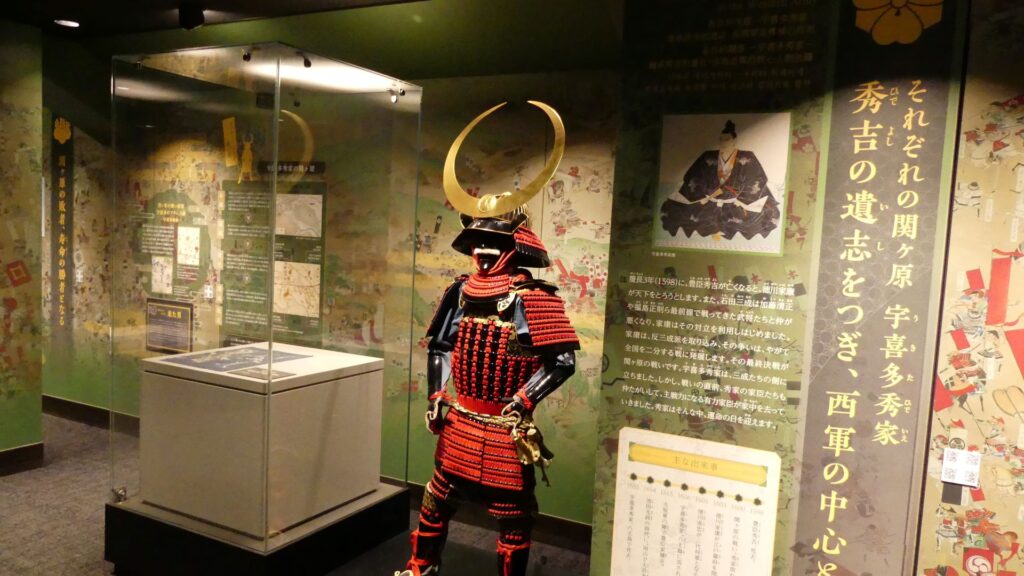
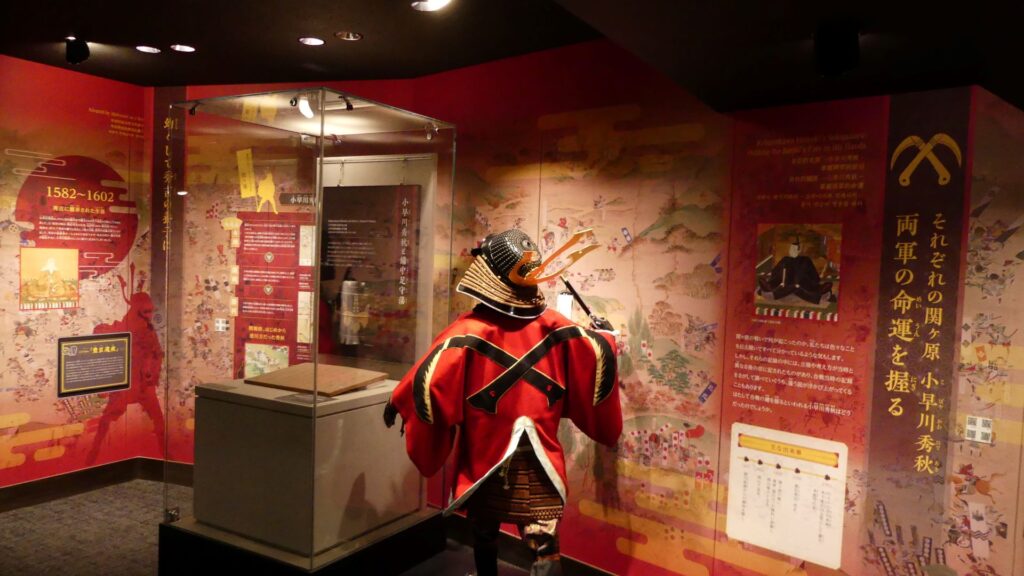
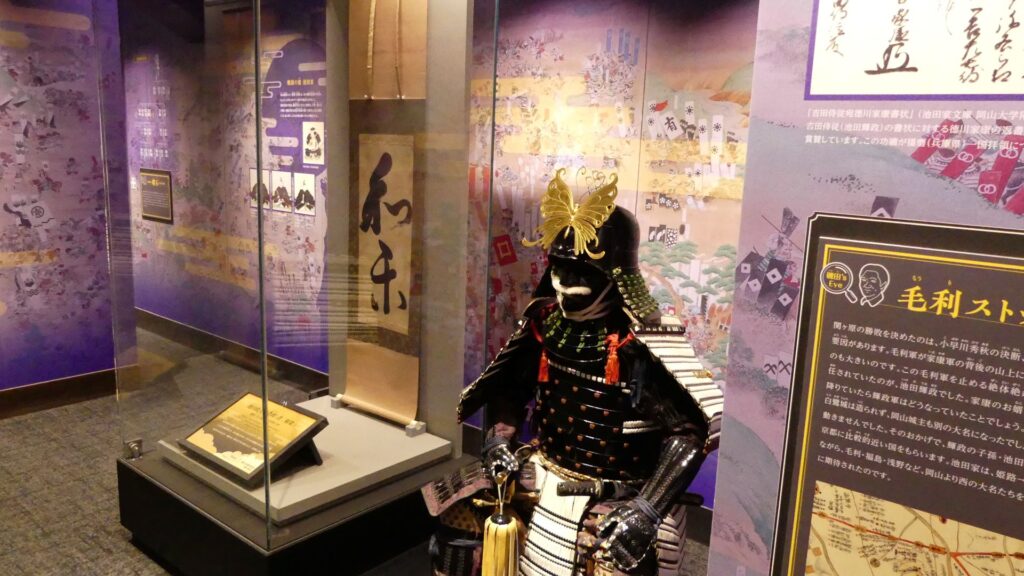
The current main tower has apparently been restored and is used as a historical museum. It was recently renovated as well. For example, the room for the lord, which had been built in the original main tower, was recreated in the current tower. There are also interesting exhibitions about the three lord families, called “Sekigahara for each”. They were all involved with the Battle of Sekigahara. The Ukita Clan joined the Western Allies, and the Ikeda Clan joined the Eastern Allies. Meanwhile, the Kobayakaya Clan switched from the Western to the Eastern Allies. Their different positions are exhibited using different theme colors.

The apparently restored main tower
The basement floor of the tower
The recreated room for the lord on the 2nd floor, on the left side is the Tokonoma (Alcove)
The Ukita Clan’s part of the Sekigahara exhibitions, represented by the color green
The Kobayakawa Clan’s part of the Sekigahara exhibitions, represented by the color red
The Ikeda Clan’s part of the Sekigahara exhibitions, represented by the color purple

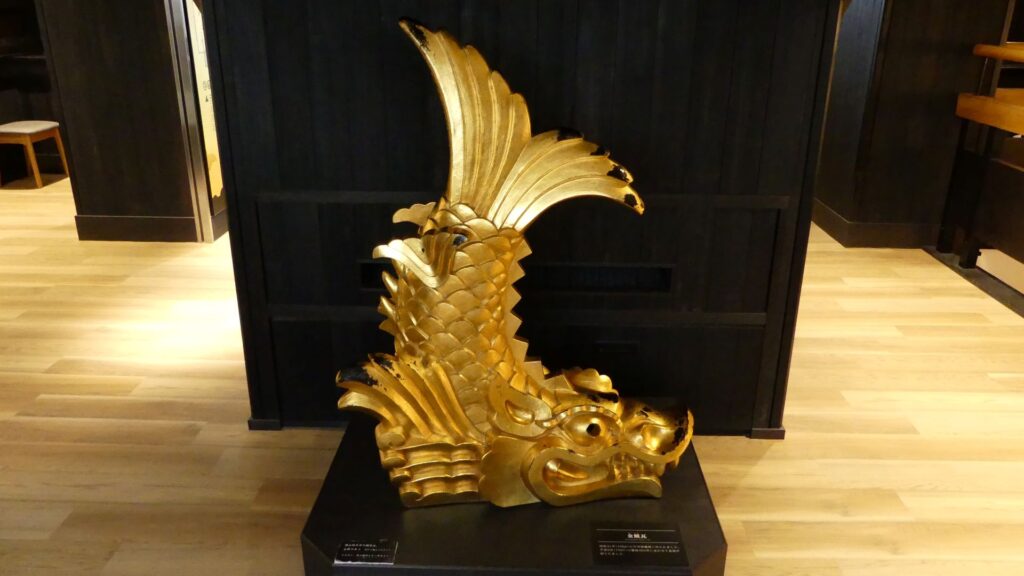
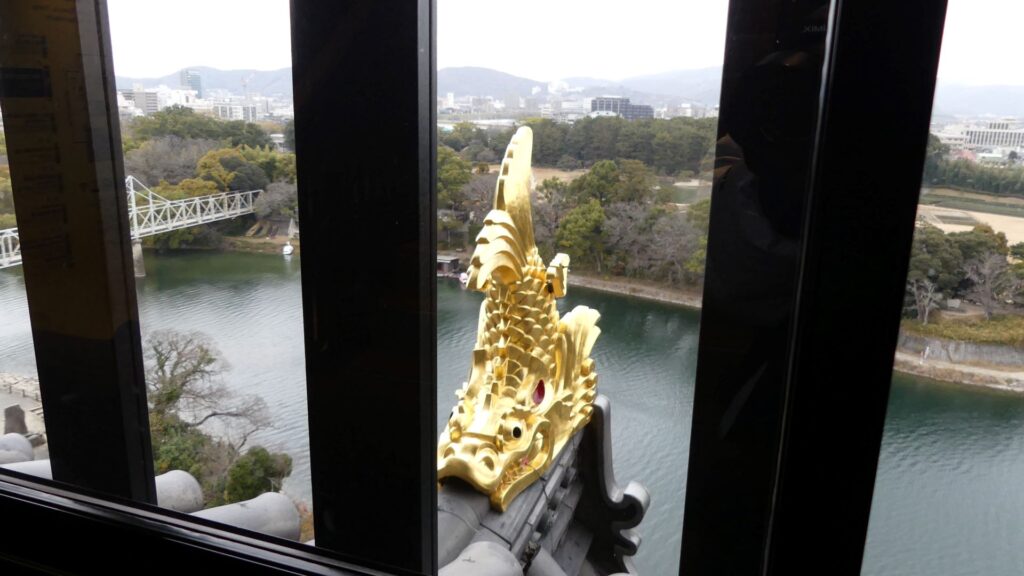
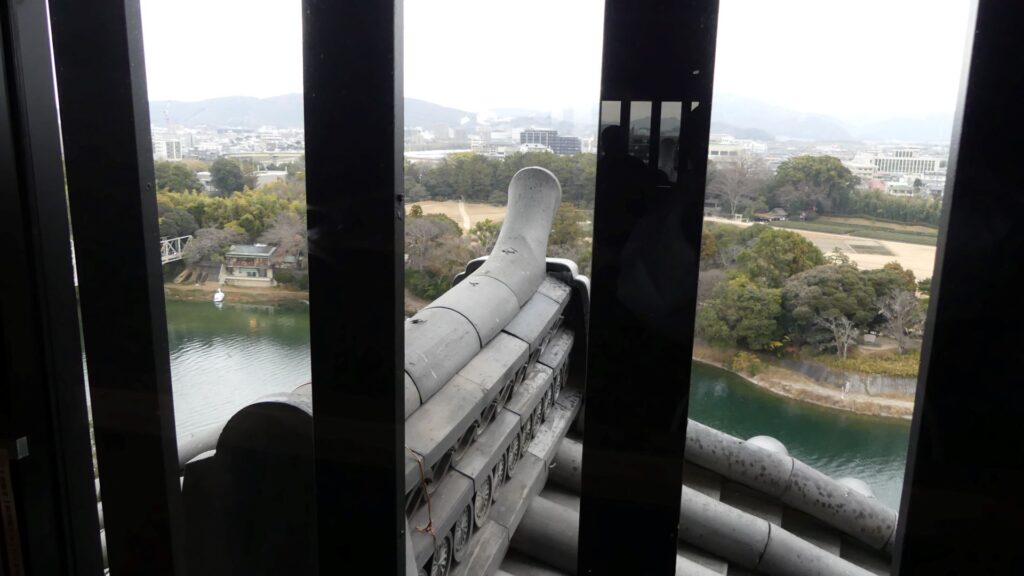
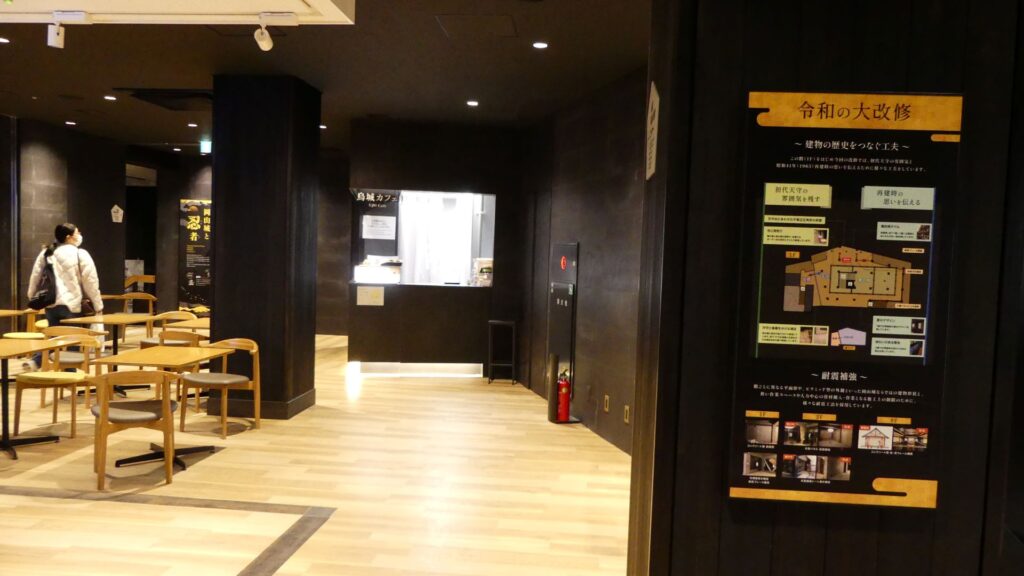
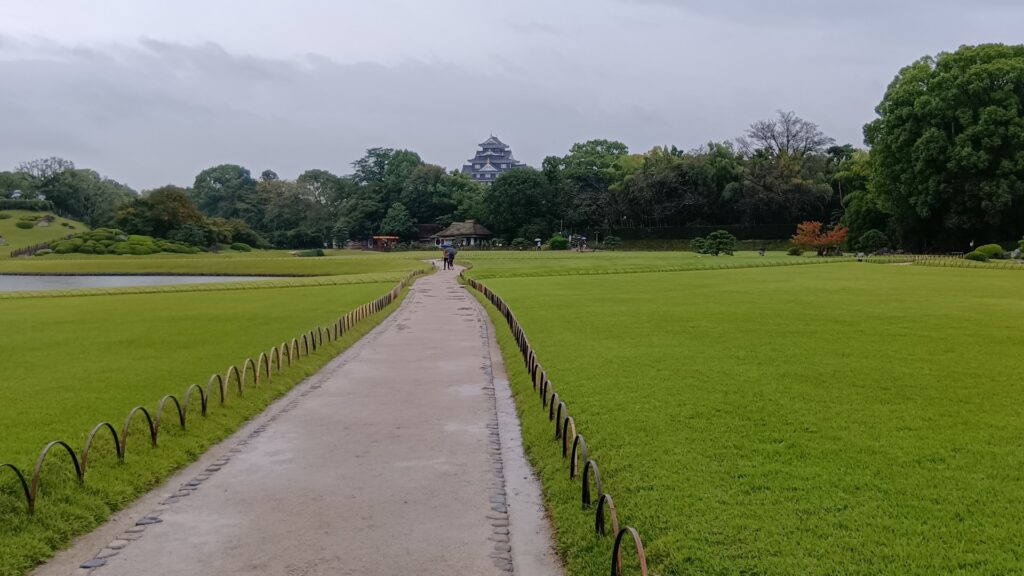
If you go up to the 5th floor of the tower, you will see the grampus rooftile with golden leaf, which is the same size as the one used outside. This tower has 8 grampus rooftiles, one of which can be seen from the floor. On the top (6th) floor, you can also see views around the tower, including Okayama Korakuen Garden. In addition, you can take a break at the café space located on the 1st floor, where you can learn more about the castle using the explanation videos with English subtitles. For example, the videos explain a day in the life of the lord.

The grampus rooftile with golden leaf, exhibited on the 5th floor, It was believed that the grampus rooftiles were represented by a fish, because the lords of the castle believed the fish could put out accidental fires
One of the grampus rooftiles on the roofs, seen from the 5th floor
Okayama Korakuen Gaden seen from the top floor
The café space on the 1st floor

After getting out of the tower, it might be worth re-experiencing the day in the life of the lord. The lord usually went down from his residences at the main tier to the middle tier through another exit after he woke up. We will also leave the tier through the same route as the lord. The exit is beside the main tower which leads to the middle tier. The lord usually walked on the passage of the Roka-mon Gate (Roka means passage) while we will walk down on another slope.

The entrance of the passage of the Roka-mon Gate

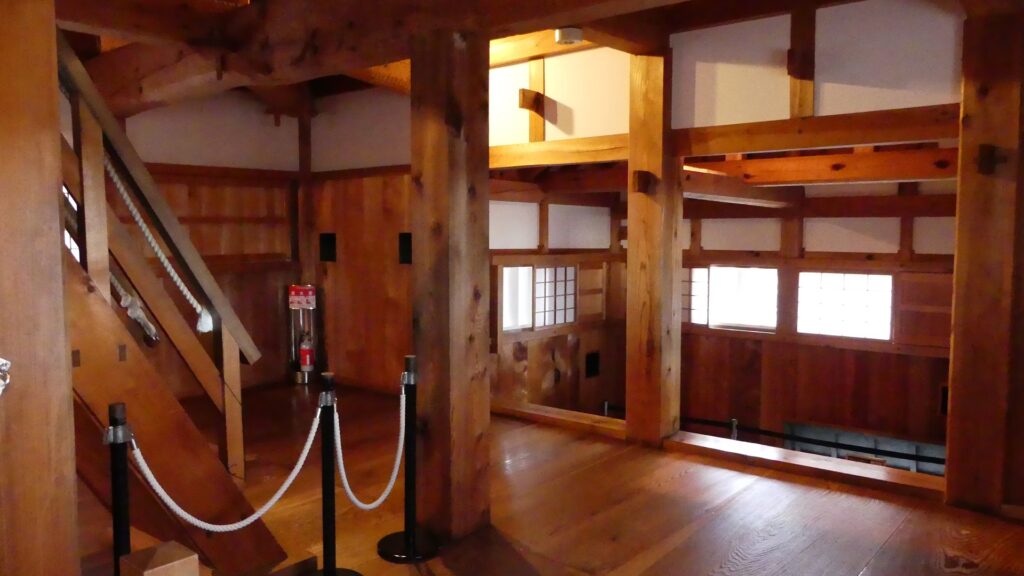
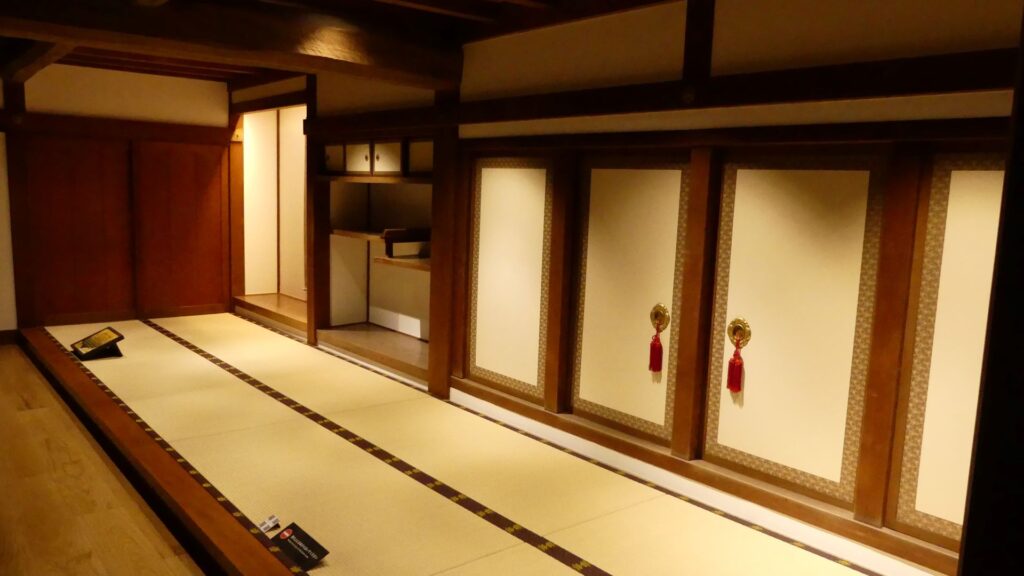
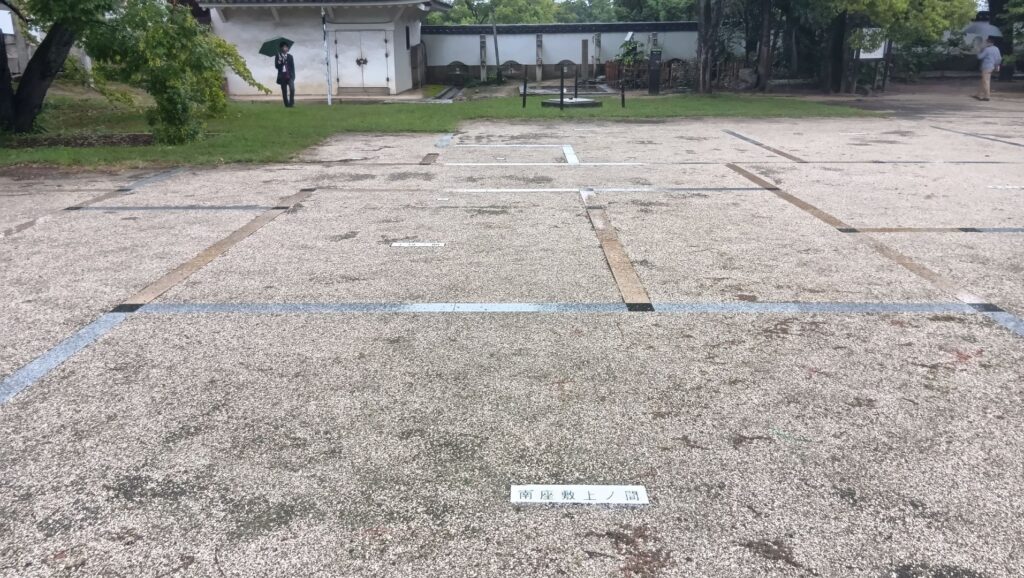
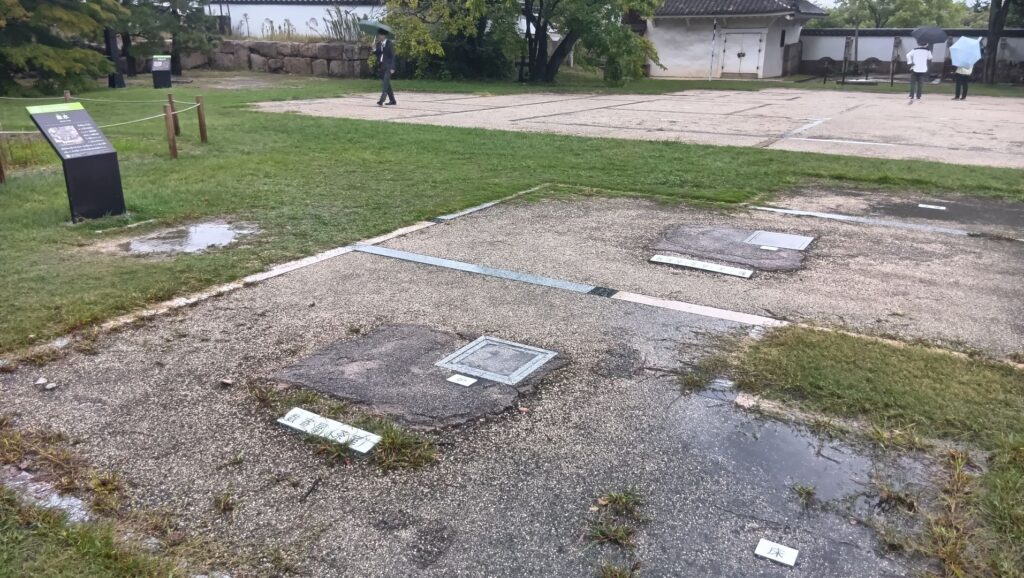
The lord entered Shounkaku room of the government office, called “Omote-shoin” to work. His work usually finished in the morning, so he would move to another room called “Minami-zashiki” to enjoy creating art. These rooms didn’t survive; however, their flat arrangements are exhibited on the middle tier. Therefore, we can easily imagine how he spent his days in the past. If he needed to discuss about important issues with his senior vassals, they would gather at the tearoom.

The middle tier in the front, the main tower in the back, and the Roka-mon gate on the left
The ruins of the Omote-shoin office, there was the Shounkaku room in the back and the Minami-zashiki room in the front
The ruins of the tearoom, the square figure sitting in the middle is a tea kettle

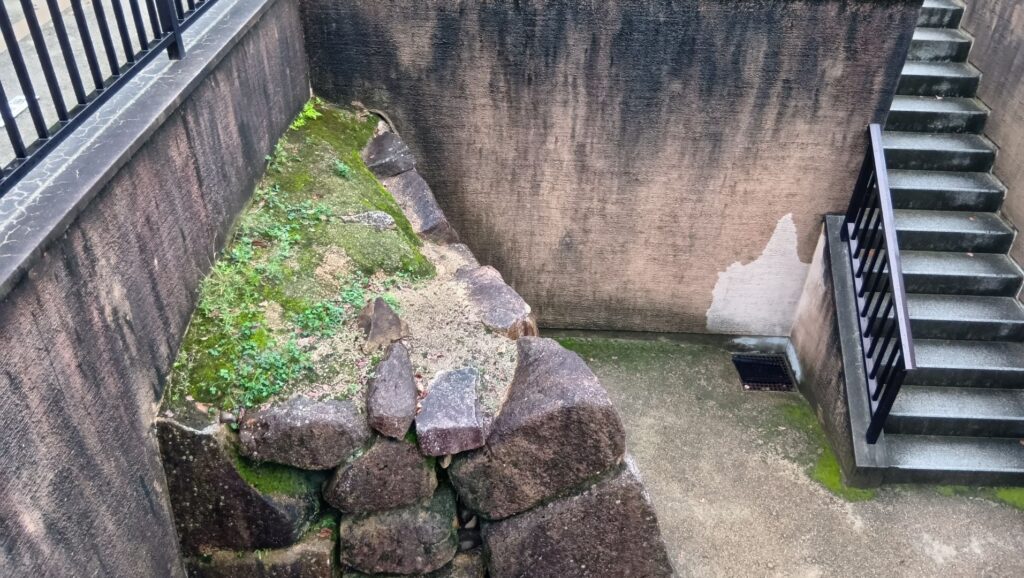
Another interesting item of the tier is the excavated stone walls of the Ukita Period. You need to walk down on the steps to see them. The walls are supposed to have been used as part of a gate. That means the middle tier was smaller than that of the Ikeda Period during the Edo Period.

The stone walls of the Ukita Period

By Visiting Okayama Korakuen Garden, You will feel like the Lord

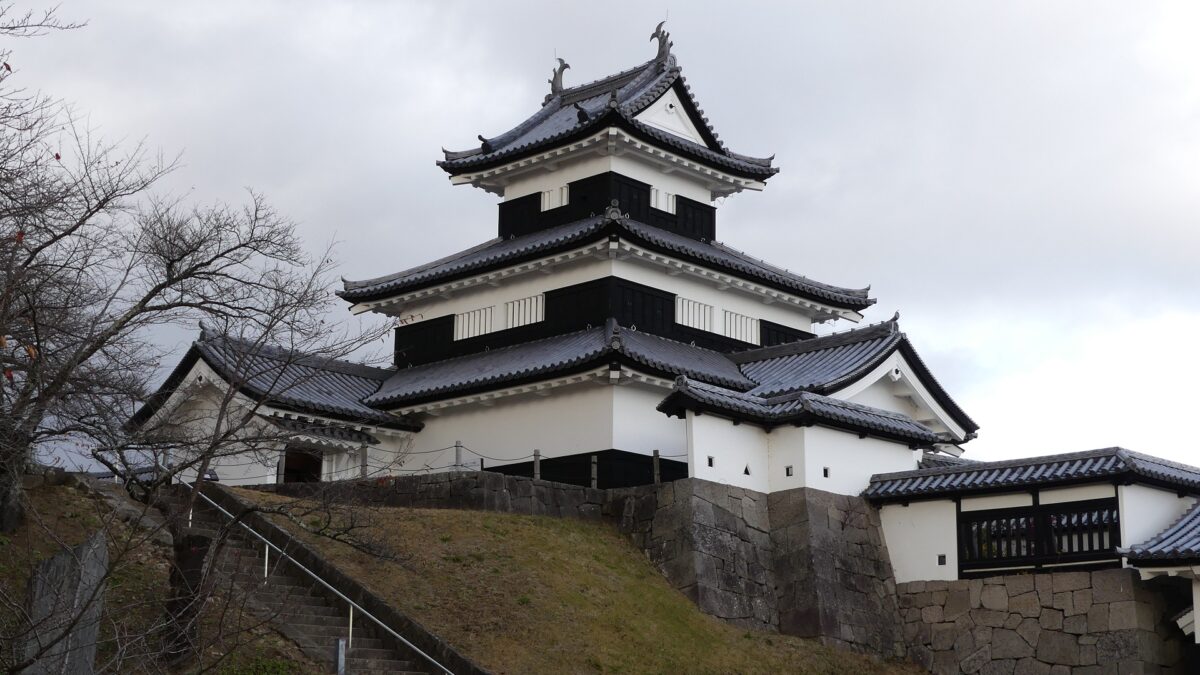
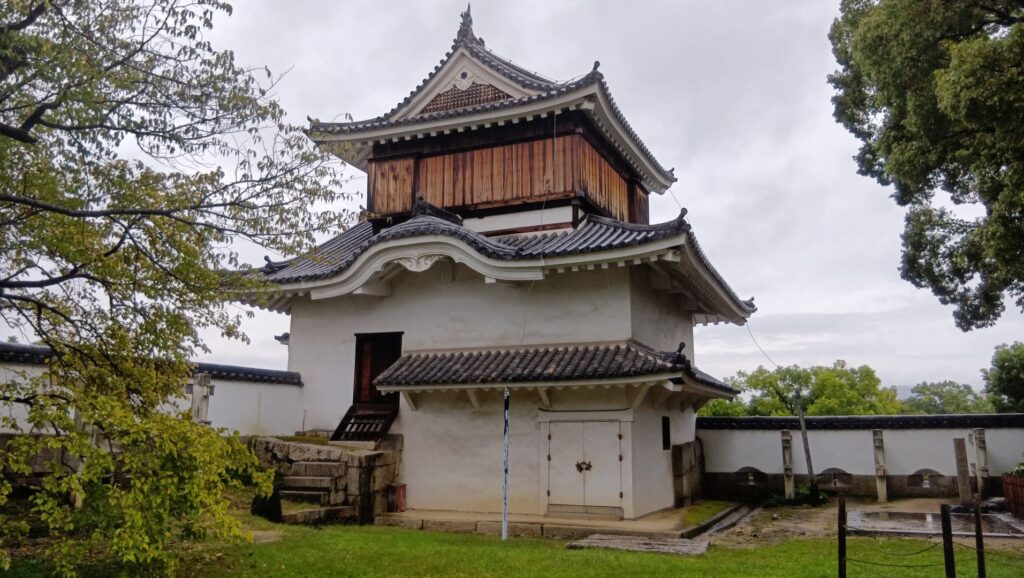
Before going to the garden, let us check out the Tsukimi Turret, the other remaining building of the castle, on the middle tier. It was built during the Ikeda Period, so it has a different appearance from the main tower which was originally built during the Ukita Period. In addition, the turret looks more elegant when you see it from the inside of the tier, but it looks different when you see it from the outside. It has machicolations on its outside to attack enemies. You will find gun holes on the stone walls next to the turret. These stone walls were piled up using well-processed stones in order to avoid enemies from climbing them. The walls of the turret are covered with thick white plaster to avoid them from burning from fires as well. That’s why it looks white in contrast to the black walls of the main tower. Some say it survived the air-raid during World War II unlike the black tower which burned. It has been designated as a National Important Property as well.

The Tsukimi Turret (inside), Notice the wooden curtain on the top floor, which are used to cover the windows
The Tsukimi Turret (outside)
You can see some gun holes on the wall

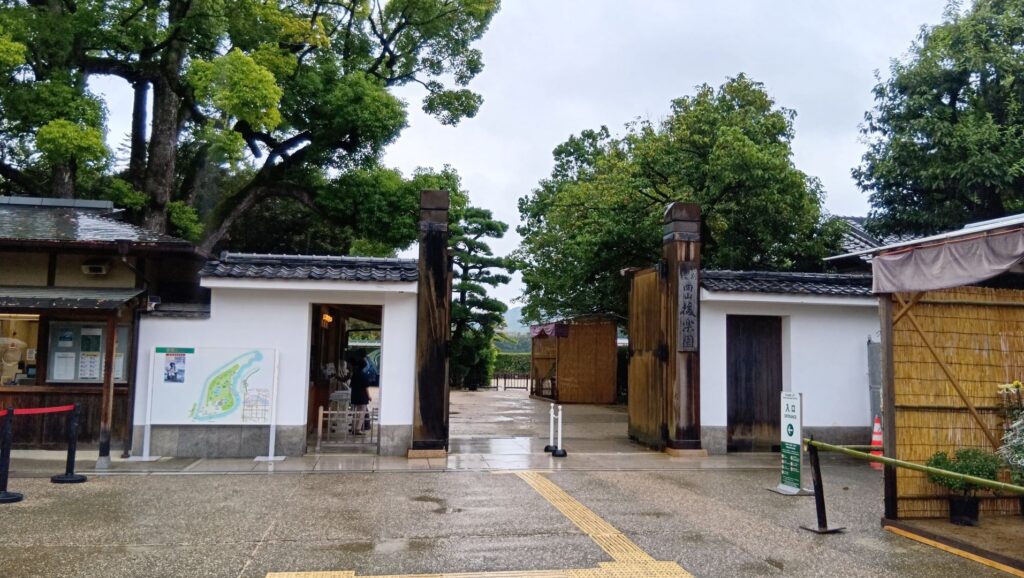
Then, we will next go to Okayama Korakuen Garden.

Tsukimi Bridge to the garden
The front entrance of the garden

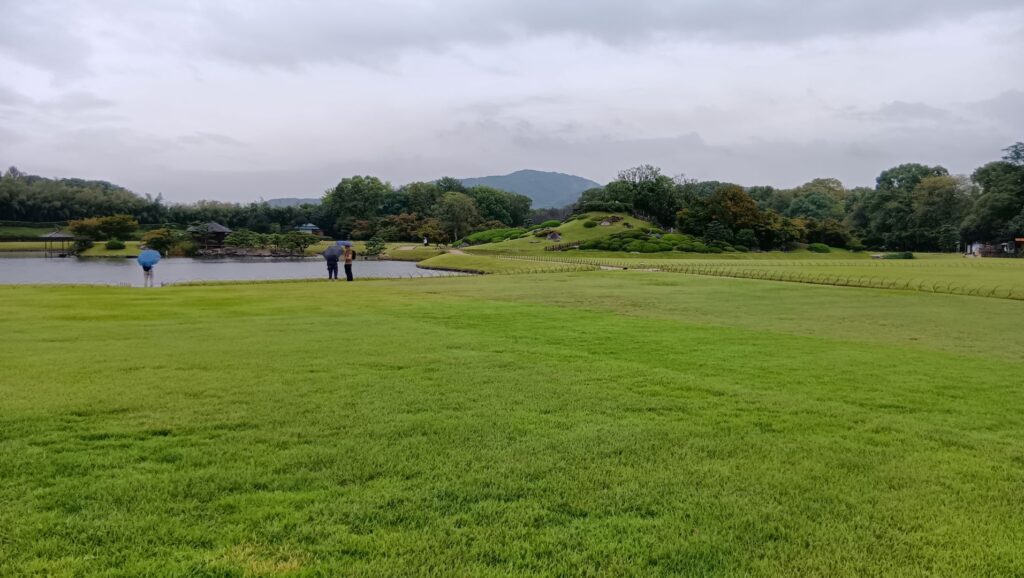
In this garden, natural scenery outside is used as the background for it, which includes Okayama Castle.

Natural scenery with the background of Misaoyama Mountain in the distance located in the center of the picture
Natural scenery with the background of Okayama Castle

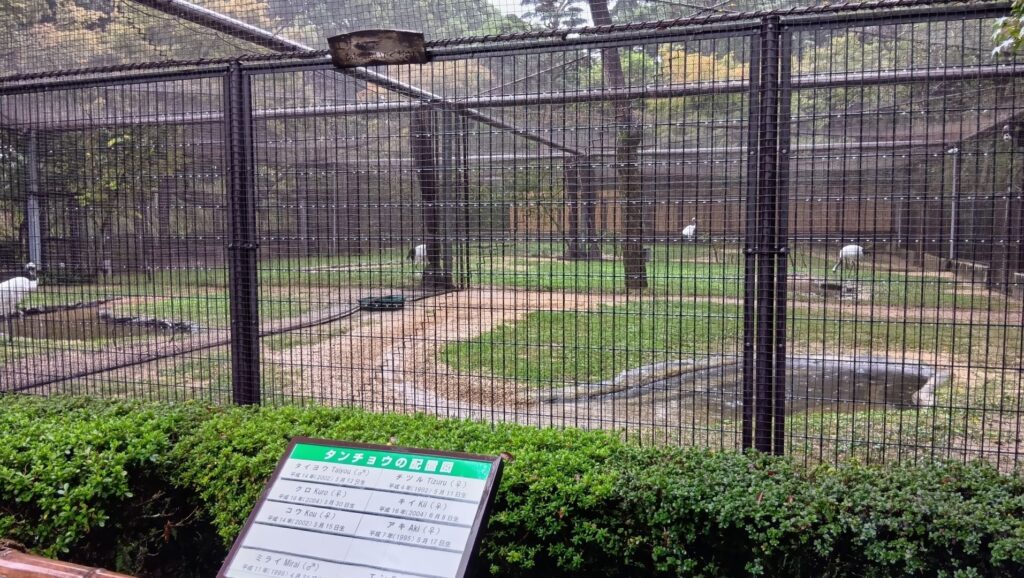
Some red-crowned cranes are kept in the cage of the garden. However, they were let loose around the garden in the past. They are currently let loose around it on some days in autumn and winter.

The red-crowned cranes are kept in the cage

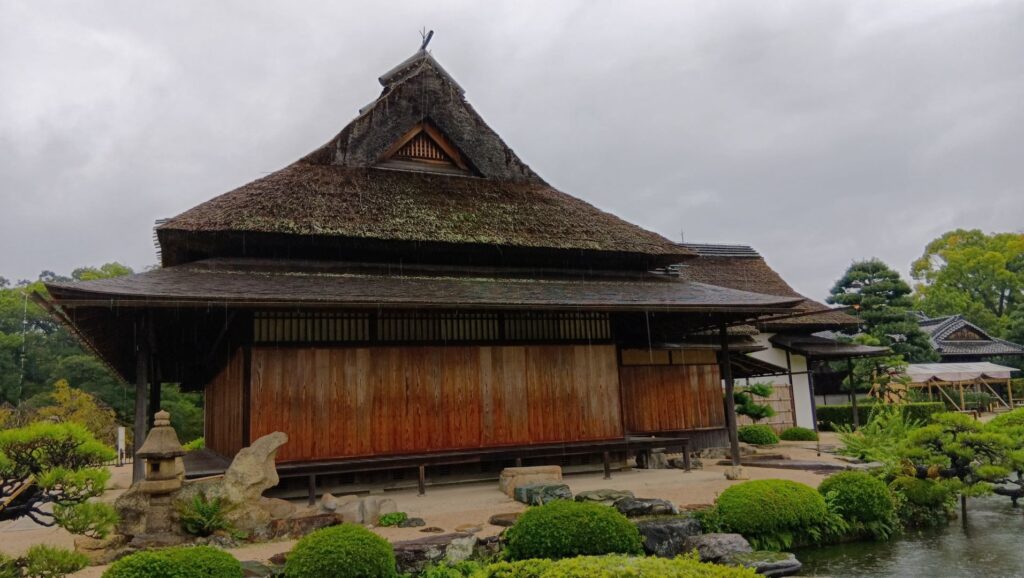
This is the living room for the lord, called “Enyotei”. The original one was burned down during the World War II but was eventually restored.

The Enyotei living room

There was also the guest house, called Kakumeikan (which means cranes’ crying voice hall) next to the Enyotei room, but it was burned down at the same time. After that, the residence the Kikkawa Clan had used at Iwakuni was moved to the current position and used as the current Kakumeikan.

The Kakumeikan residence

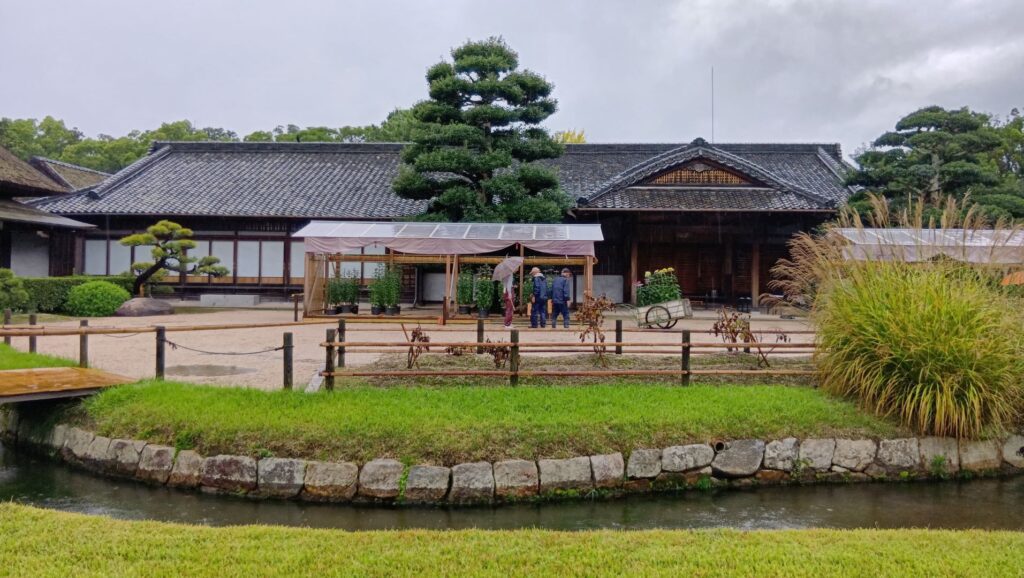
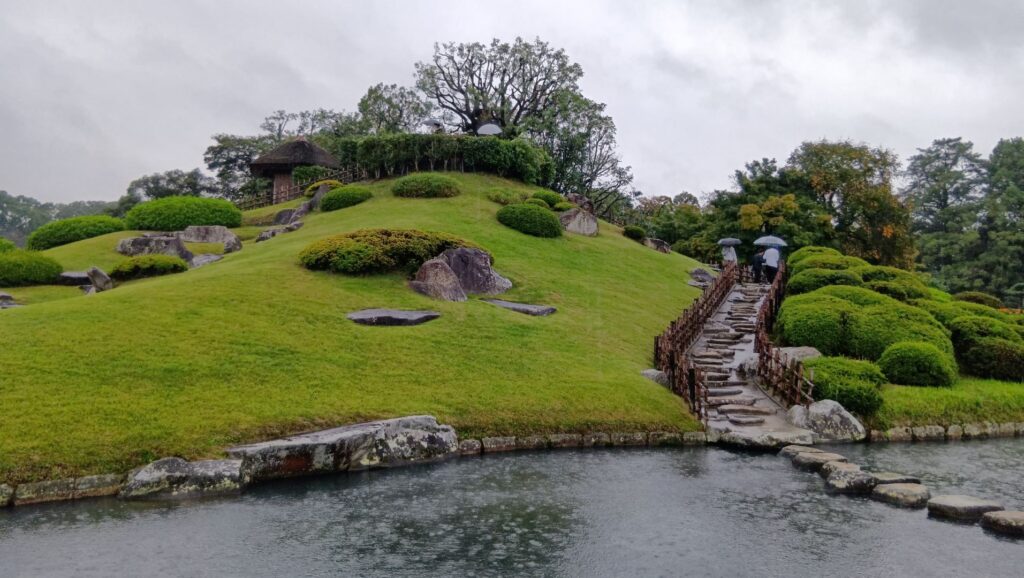
The artificial hill in the center of the garden, called “Yuishinzan”, was built by Tsugumasa Ikeda who was the successor of Tsunamasa Ikeda, the founder of the garden. You can see the grass and ponds in the garden very well from the top. You may also find a small rice farm, called “Seiden”. It is said to be the remains of what the garden originally looked like when the founder first built it.

The Yuishinzan hill
The Seiden rice far, Notice part of the rice farm is occupied by water lilies

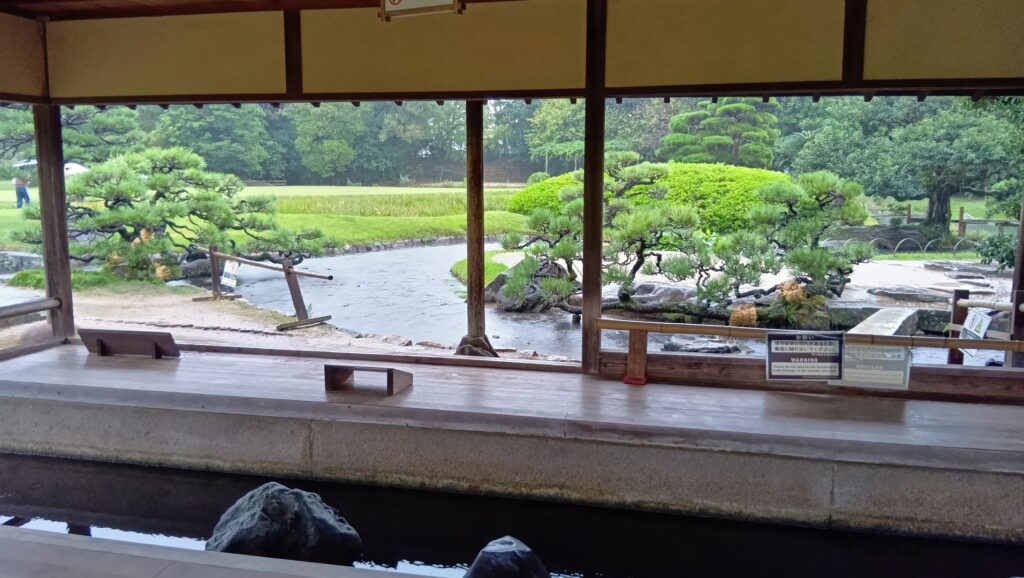
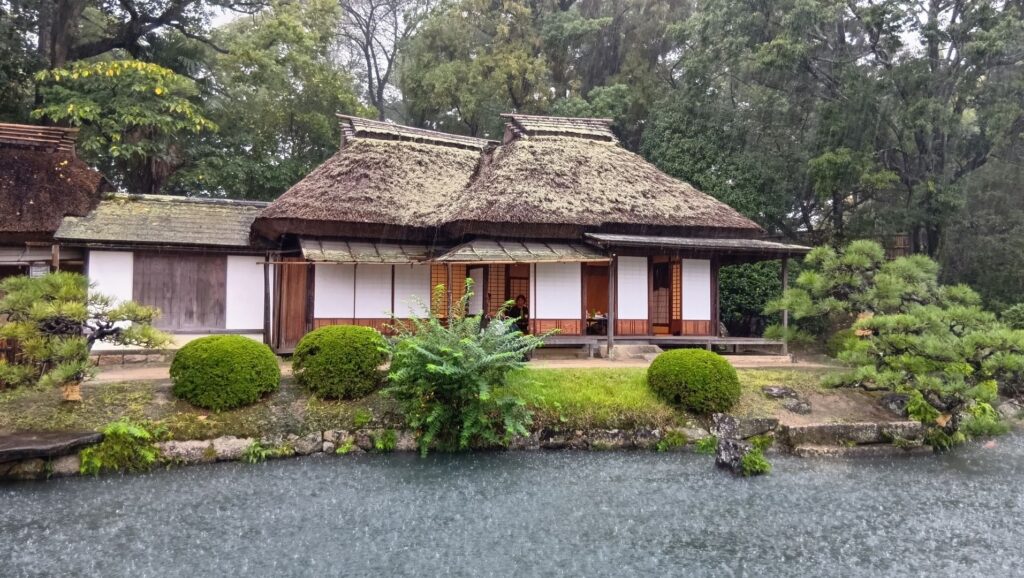
There is also a rest house, called “Ryuten”, which is one of the few remaining original buildings of the garden. You can sit and rest there while looking the scenery of the garden. Renchiken is another remaining building which looks like a farmer’s house. Tsunamasa liked it very much and often stayed there and sometimes invited his excellent retainers for ceremonies.

The Ryuten rest house
The Renchiken house

That’s all. Thank you.

Back to “Okayama Castle Part1”

13.Shirakawa-Komine Castle Part3

Go along the former Oshu Road to the north until you get near Abukuma River, and look back to the left, you will see another great scenery. It is 180m long stone walls on a hill along the river, called Komine Castle Eastern Stone Walls.

Features

Walking around Main Enclosure

If you want to see other attractions of the castle, you can get out of the main enclosure through the ruins of Sakura-no-mon (meaning the cherry gate) to walk around the stone walls of the enclosure on the belt enclosure, the lower tier of the main portion. The ruins of Tsukimi-Yagura (meaning the moon viewing turret) are in front of the gate ruins of the enclosure, which look very strong with their remaining stone wall base.

The map around the main enclosure

The ruins of Sakura-no-mon Gate
The entrance of the belt enclosure
The ruins of Tsukimi Turret seen from the second enclosure below
The back of the Tsukimi Turret Ruins

The belt enclosure surrounds the western and northern sides of the main enclosure. You can feel relaxed by walking on the belt enclosure, while enjoying looking at the great, long and high stone walls of the main enclosure. These stone walls look well-maintained. However, they collapsed heavily during Great East Japan Earthquake in 2011 and were repaired by Shirakawa City for the following eight years (completed in 2019).

The western part of the belt enclosure
The great stone walls of the main enclosure
The northern part of the belt enclosure
The explanation board of the stone walls being destroyed by the earthquake and repaired later on

You will eventually reach the other gate ruins of the belt enclosure, called Ya (arrow)-no-mon. You can see a great view of the three-level turret at the northeastern edge of the main enclosure on the right. However, if you were an enemy, the defenders would attack you through the turret’s machicolations and loopholes facing you.

The ruins of Ya-no-mon Gate
The turret seems to look targeting you

Going to Outside of Castle

Another recommendation for you is to visit the former third enclosure, which is the east of the main portion. It has turned into the city area mainly including public facilities. There is only one remaining castle building among the area, the Taiko-Yagura Turret, which was originally used beside the Taiko-mon Gate in the second enclosure. It was moved to a private sector, converted to a tea room, and finally moved to the current position where it has been since 1930.

The map around the castle

The Taiko Turret has become a tea room

If you go further to the east until the National Route 294 (the former Oshu Road), go along the road to the north until you get near Abukuma River, and look back to the left, you will see another great scenery. It is 180m long stone walls on a hill along the river, called Komine Castle Eastern Stone Walls. In fact, they were recently discovered when the pine trees on the hill were cut down for the bypass road constructions. They must have been built to protect the castle from the threats from the north. These stone walls connect to the back gate of the castle, which opens to the north, but you can’t go directly to the gate due to the construction site between them.

Komine Castle Eastern Stone Walls
Looking the stone walls from the bridge over the Abukuma River
No entry is allowed around the stone walls due to the constructions
The ruins of the back gate

My Impression

While visiting the well-remaining structures and restored buildings of Shirakawa-Komine Castle, I felt the strong intentions of Nagashige Niwa, the builder of them, to protect the castle from possible enemies from the north. He must have been one of the few lords to do it properly and quickly. I also think that the history during the Boshin War lets us to know that such a strong castle had a weak point and could not survive without enough soldiers and proper instructions

The three-level turret seen from Abukuma River, north of the castle

How to get There

If you want to visit there by car, it is about a 10-minute drive away from Shirakawa-Chuo Smart IC on the Tohoku Expressway.
There is a parking lot in the park.
By public transportation, the castle is very near the JR Shirakawa station. You can even see the nice view of the three-level turret from the platform.
From Tokyo to the station: Get the Tohoku Shinkansen super express and transfer to the Tohoku Line at Shin-Shirakawa Station. The destination will be the next station.

The castle ruins seen from the platform of the station

That’s all. Thank you.
Back to “Shirakawa-Komine Castle Part1”
Back to “Shirakawa-Komine Castle Part2”

13.Shirakawa-Komine Castle Part2

the ruins of the castle were turned into a park. Officials changed their policy for developing the ruins because the detailed drawings of the castle buildings were left by Sadanobu Matsudaira. They were wondering if the castle would be restored to its original condition. That would be the first attempt in the way large castle buildings are rebuilt in the present time of Japan.

Later History

During the Meiji Era, the ruins of the castle were turned into a park in which the baseball stadium was constructed in during the Showa Era. Officials changed their policy for developing the ruins because a lot of citizens complained and the detailed drawings of the castle buildings were left by Sadanobu Matsudaira. They were wondering if the castle would be restored to its original condition. That would be the first attempt in the way large castle buildings are rebuilt in the present time of Japan.

The aerial photo around the castle during the 1970’s

The detailed drawing of the three-level turret Sadanobu Matsudaira left

However, there was a big problem with the law. Japan’s Building Standard Act has very strict restrictions on wooden buildings which are over 13m tall. According to this law, new large old-style wooden buildings like the Shirakawa-Komine castle turret are not allowed to be built. So officials continued the restoration of the turret not as a building, but as a structure that would be allowed by the law. It was finally completed in 1991. However, another problem occurred as the government made the most part of the turret inaccessible to visitors, because it was not “a building”. At last, the law had the provisions to be exempt for historical buildings in 1993. The three story-level was finally opened to visitors.

The restored three-level turret

Features

Castle Ruins still look Strong

Today, if you stand in front of the ruins of Shirakawa-Komine Castle, called Shiroyama Park, you will be impressed by its wide remaining stone walls and the slim restored three-level turret on the top. The entrance of the park was that of the second enclosure, which had Taiko (drum)-mon Gate. The enclosure has become an open space where people can enjoy relaxing and exercising. It is also partially used by public facilities such as Komine-jo(castle) History Museum and a tea house.

The aerial photo around the castle

The entrance of the second enclosure (the ruins of Taiko-mon Gate
The inside of the second enclosure
The appearance around the second enclosure in the past, from the miniature model of the castle, exhibited by Komine-jo Castle History Museum

The main portion of the castle ahead still looks very strong, which is surrounded by the inner moat and two-tiered high stone walls. These tiers consist of the main enclosure on the top and the surrounding Take (bamboo)-no-maru Enclosure. You need to go across the earthen bridge over the moat and the ruins of Shimizu(pure water or spring)-mon Gate to enter it. The gate was the largest one in the castle and Shirakawa City is actually planning to restore it by 2026 (as of January 2024). Next, if you climb the stone steps and turn right on the Take-no-maru Enclosure, you will see the three-level turret close by.

The ruins of the Shimizu-mon Gate
Going to the Take-no-maru Enclosure
The Take-no-maru Enclosure
The appearance around the Shimizu-mon Gate and the Take-no-maru enclosure in the past, from the miniature model of the castle, exhibited by Komine-jo Castle History Museum

Good Combination of restored Turret and Gate

You can also see Mae-gomon (meaning the front gate) next to the turret which has been restored in the original way since 2004, following the turret. The set of the turret and the gate looks very good and shows the authority of the castle. If you enter the gate, you will be at the main enclosure, which is an empty space but had the main hall for the lord in the past.

The three-level turret (in the back) and the Mae-gomon Gate (in the front), seen from the Take-no-maru Enclosure
The ruins of the main hall of the main enclosure
The appearance around the main hall in the past, from the miniature model of the castle, exhibited by Komine-jo Castle History Museum

The three-level turret stands on the northeastern corner of the enclosure. Its three floors are simply built with the 11.7meters (6 Ken in the traditional Japanese unit of length) square of fist floor, the 7.8 meters (4 Ken) square of the second one and the 3.9 meters (2 Ken) square of the top one. Each level also has simple roofing and has two-tones of colored walls from white plaster and black-painted lumber. Overall, the tower looks very beautiful with its good design and color arrangement.

The three-level turret, seen from the inside of the main enclosure

Interior of Turret is completely restored as well

You can enter the turret from the inside of the enclosure. From the processes of restoring this turret, officials always stay inside and monitor the safety of the visitors. For example, only five visitors can stay above the first floor at the same time under the current regulations. That’s because the turret was restored exactly in the same way as the original one except for the minimum safety equipment and explanation boards. If you walk around the first floor, you will find that it is not bright and many columns standing inside. Some of the columns came from pine trees of Inari Mountain, one of the hills where the severe battles occurred in 1868 during the Boshin War. That’s why you can see the bullet marks, caused by the war, on one of them.

The interior of the first floor
the bullet marks on the column of the first floor

You can also see the defense systems like machicolations, loopholes and bay windows at the northern and eastern sides of the floor. These sides face the outsides of the enclosure, which could have been attacked by enemies.

A machicolation built in the first floor
The loopholes built in the first floor (the black square ones)

If you want to go to the second and third floors, please be careful when climbing the very steep stairways, but you can use the handrails and ropes.

The steep stairways to the second floor
Looking down the stairways

As you go above, the floor becomes smaller and you may feel you are in a box on the top floor. The floor also has defense systems similar to other floors, where you can understand the turret is very practical for battles. In addition, you can see views of the outside through the lattice windows of the floor.

The interior of the second floor
The interior of the third floor
A view through a latticed window

To be continued in “Shirakawa-Komine Castle Part3”
Back to “Shirakawa-Komine Castle Part1”